Description
Shadow Stealth implements “hide in the shadows” gameplay mechanic, perfect for thieves, assassins, and alike. All the features are easily accessible from Blueprints, including very easy integration with AI Perception. No C++ knowledge is needed.
Features
- Supports All Light types and mobilities.
- Supports per-channel (RGB) light intensity.
- Includes UE4 GI into calculations, does not include Lumen at the moment.
- Integrates with AI Perception component through AI Sight sense.
- AI Perception integration is extendible with Blueprints and C++.
- Easy setup with a handful of components. Level editor tools and predefined actors are provided for convenience.
- Performance is independent of the size of the map and the number of lights.
Gallery
Downloads
Example project:
- executable (win64)
- project (4.26 and later)
- project v1.7 (4.22-4.25)
- project v1.3 (4.21)
Changelog
1.8
- Remove AISight deprecated features
- Code cleanup
- Give BP/C++ access to ShadowSightTarget instance
- Give BP access to properties of ShadowSightTarget C++ implementations
- Ignore ShadowStealthComponent owning actor in light traces
1.7
- Update for UE 5.0 EA and git branches: 5.0, UE5-main
1.6
- Exposed light components in shadow light actors
1.5
- Fixed packaging error
1.4
- New named notifications
- BP and C++ extendible AI Sight integration
- AI Sight Target with distance multiplier (per M.O.A.dev request)
- Workaround for UE 4.24 bug UE-86045
1.3
- Volumetric Lightmap support
- RectLight support
- Fix ShadowStealthComponent tick behavior
1.2
- Add AISightShadowSenseEnabled for enabling/disabling if AISight sense uses shadows (Shadow Stealth default) or not (AIPerception default)
- Add new methods of calculating light intensity from multiple test sockets: max, min, mean, median
- Add Shadow Lights and Shadow Stealth Character actors to placement mode
- Add TestSelfLocation flag to shadow stealth component
- Fix handling light color
1.1
- Add getting per color channel light intensity
- Fix handling light color
Documentation
Basic Usage
Scene Setup
Shadow Stealth handles static lighting differently than dynamic lighting.
Static Lighting
Shadow Stealth uses static lighting information baked by the engine. The downside of this solution is that you cannot choose which static lights should be taken into account for lighting intensity computations. But on the upside GI is taken into account.
The setup needed for static lighting is minimal. First, you need to enable ‘Use Static Lighting’ option in Shadow Stealth plugin settings (it’s enabled by default):
- Open the ‘Project Settings’ window. You can do this through the ‘Edit’ menu in the menu bar.
- In the navigation panel, on the right side of the window, scroll all the way down to the ‘Plugins’ category and click on the ‘Shadow Stealth’ section.
- In the configuration panel, on the left side of the window, make sure that the ‘Use Static Lighting’ checkbox is checked.

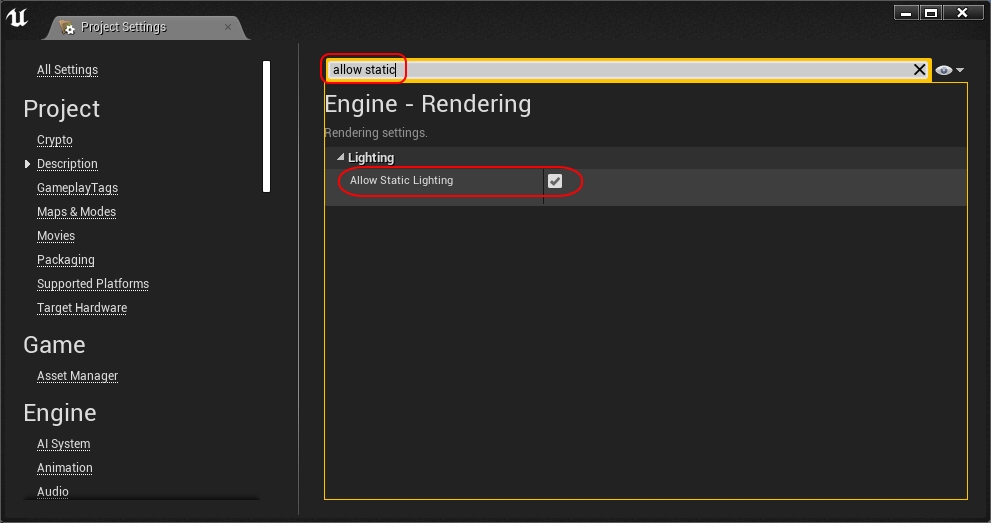
Second, you need to enable ‘Allow Static Lighting’ option in ‘Engine – Rendering’ settings (also enabled by default):
- Open the ‘Project Settings’ window. You can do it through the ‘Edit’ menu in the menu bar.
- In the search bar, at the top of the window, type ‘Allow Static Lighting’.
- In the configuration panel, on the left side of the window, make sure that the ‘Allow Static Lighting’ checkbox in the ‘Engine – Rendering’ section is checked.
If you want to preview static lighting samples color, intensity, and density, you can enable visualization in the ‘Level Editor’ viewport:
- Click on the ‘Show’ button in the top left corner of the ‘Level Editor’ viewport.
- In the dropdown menu move the mouse cursor on the ‘Visualize’ submenu.
- In the submenu check one of the checkboxes near the bottom:
- ‘Volumetric Lightmap’ for Volumetric Lightmaps
- ‘Volume Lighting Samples’ for Sparse Volume Lighting Samples
- You can now see a grid of small spheres/squares, symbolizing the color and intensity of the lighting samples, throughout the level.

Dynamic Lighting
Shadow Stealth supports dynamic lighting for Point, Spot, and Directional Lights. For each of the light types there’s a component that has to be attached to the corresponding light component:
- ShadowPointLightComponent -> PointLightComponent
- ShadowSpotLightComponent -> SpotLightComponent
- ShadowRectLightComponent -> RectLightComponent
- ShadowDirectionalLightComponent -> DirectionalLightComponent
Dynamic light components without the shadow component attached won’t be seen by Shadow Stealth plugin.
For Point, Spot and Rect Lights Shadow Light Components add colliders that are used to efficiently detect lights in range. Colliders are set up automatically based on light size and shape.
There are different methods of setting up dynamic lights on the map you can use, depending on your situation.
Shadow Light Actors
If you start with a new map and want to place a few simple light actors, you can use actors provided for you by the plugin:
- ShadowPointLight
- ShadowSpotLight
- ShadowRectLight
- ShadowDirectionalLight
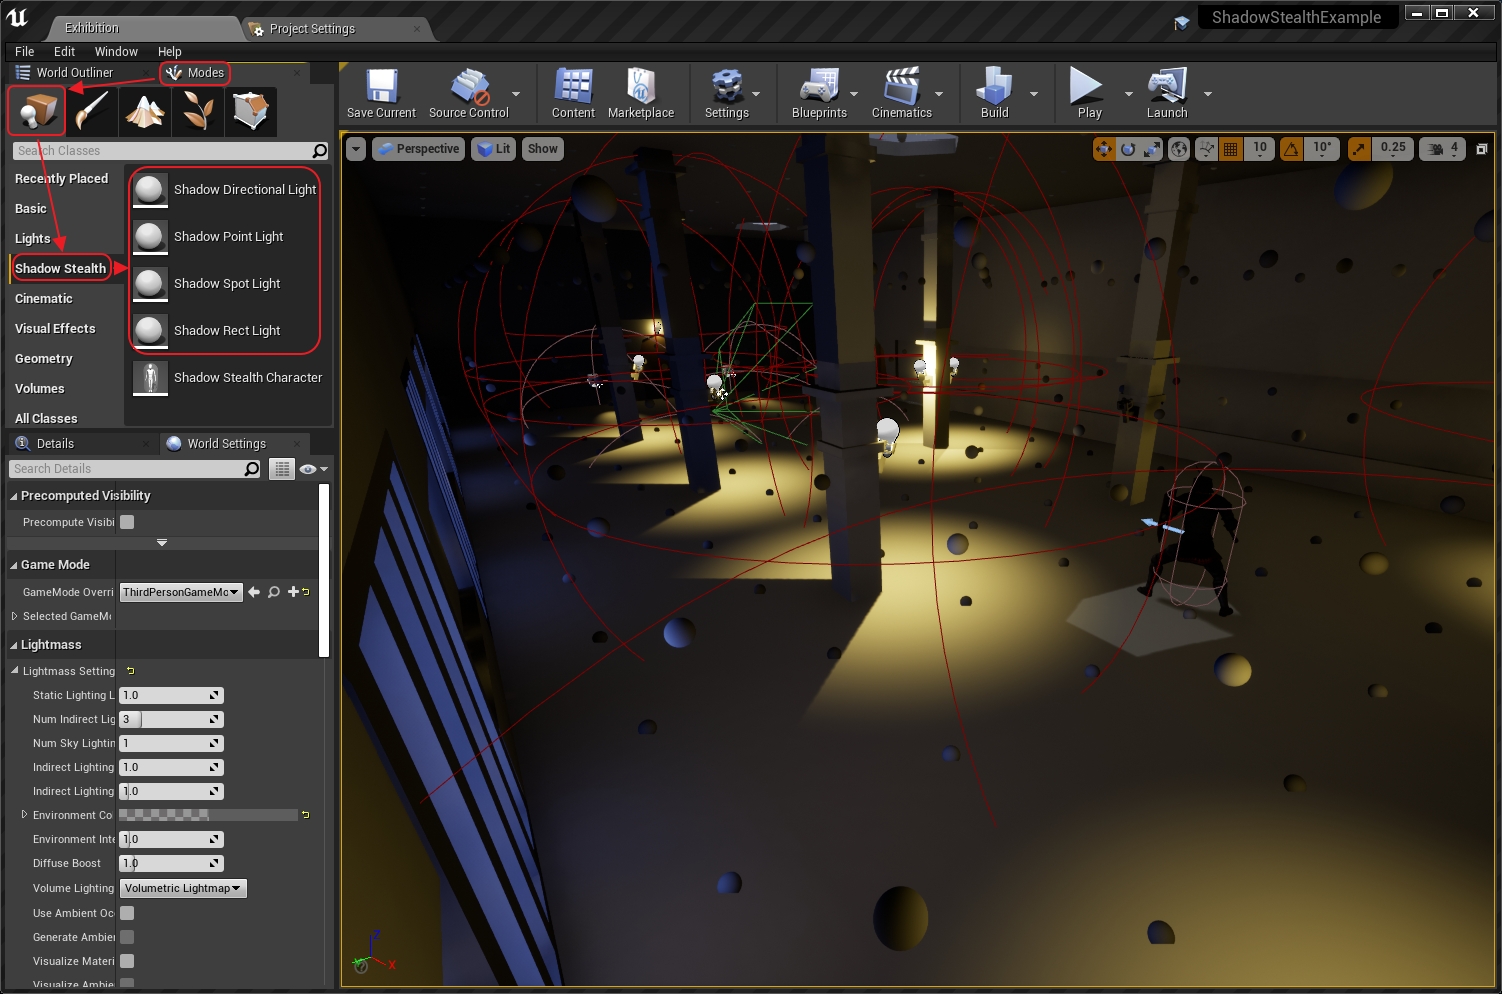
Shadow Light Actors can be found in the ‘Shadow Stealth’ section in the ‘Place Mode’ tool. You can just place them on the level:
- You will find the ‘Place Mode’ tool in the ‘Modes’ tab, usually in the top left section of the main editor window, next to the ‘World Outliner’ tab.
- In the ‘Place Mode’ tool select the ‘Shadow Stealth’ section.
- Drag one of Shadow Light Actors from the ‘Place Mode’ tool to the level viewport.
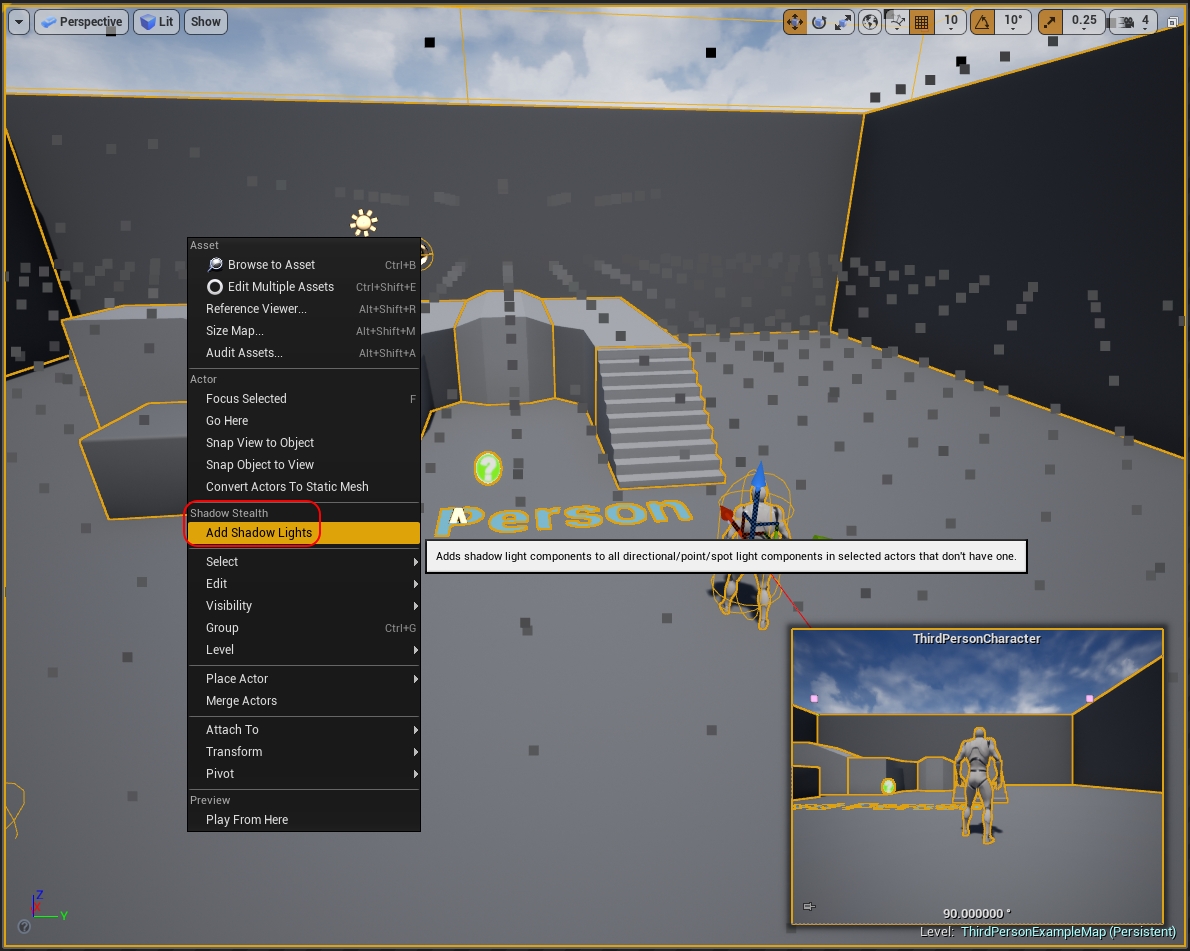
Existing Map Conversion
If you have a map that you would like to quickly convert to usable with Shadow Stealth plugin, you can use convenient ‘Add Shadow Lights’ option in ‘Level Editor’ context menu:
- In the ‘Level Editor’ viewport click on any actor to select it.
- Press ‘Ctrl+A’ on the keyboard to select all actors on the map. Optionally you could select only actors containing Light Components you want to convert.
- Right-click on any actor in the ‘Level Editor’ viewport to open the context menu with all actors still selected.
- Click on the ‘Add Shadow Lights’ option in the ‘Shadow Stealth’ category. If you cannot see this option, there are no dynamic Light Components without corresponding Shadow Light Component attached.
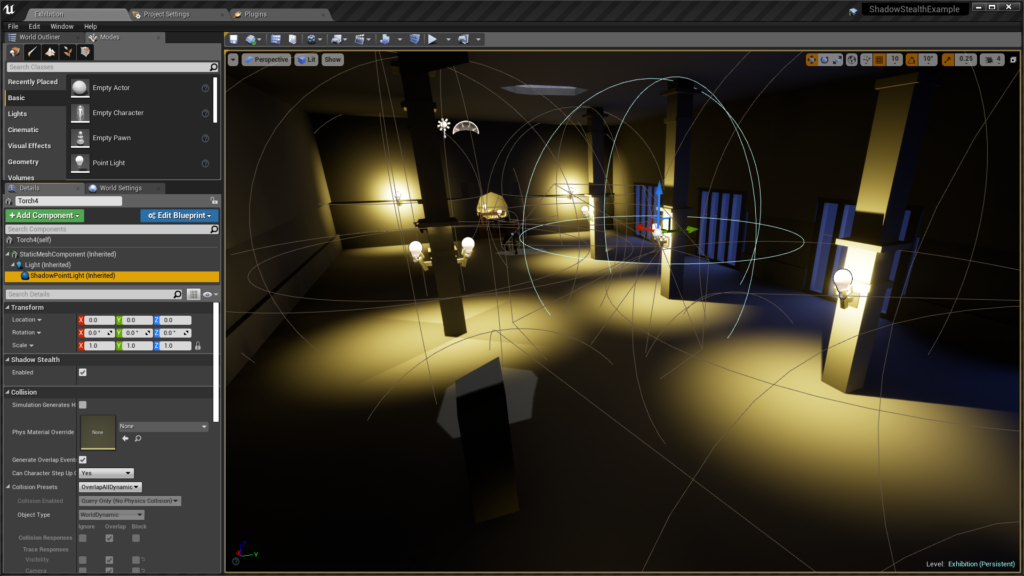
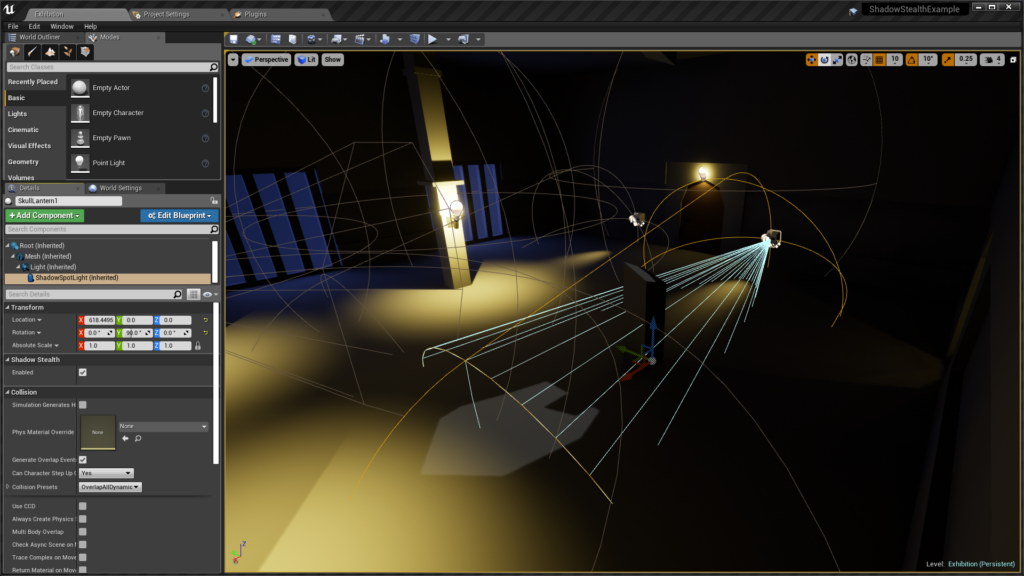
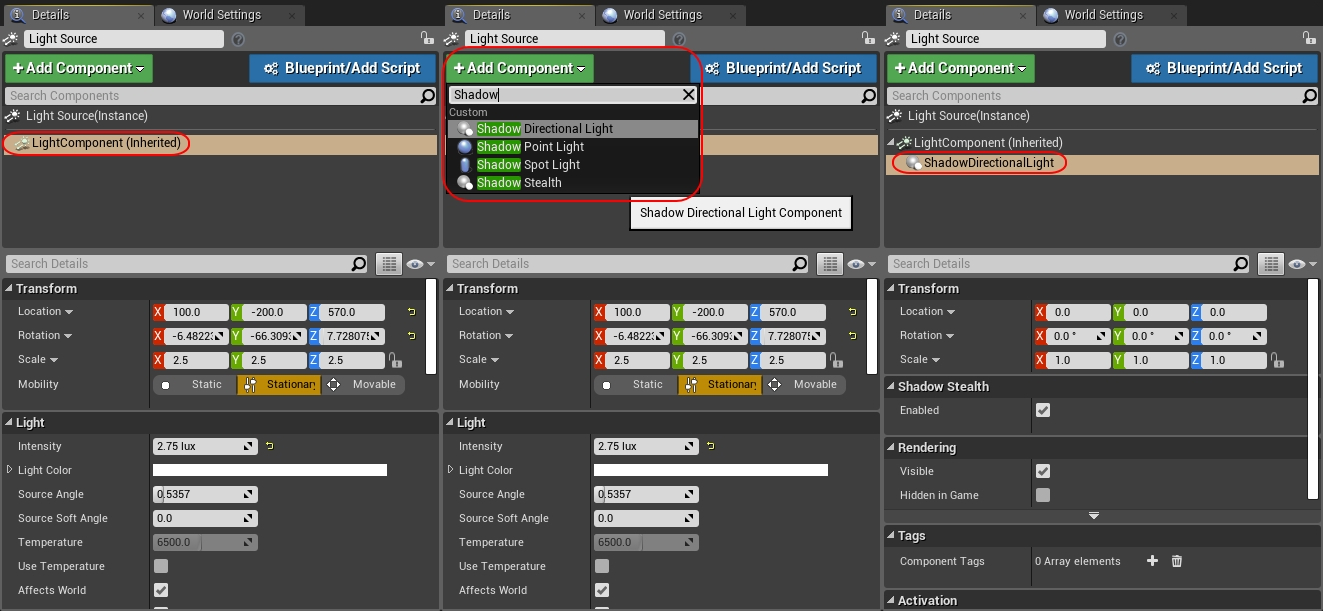
Shadow Light Components
The most versatile method is to attach the Shadow Light Component to Light Component through ‘Components’ panel in ‘Blueprint Editor’ or ‘Components’ section in ‘Details’ panel in ‘Level Editor’:
- Select the Light Component you want to use with the Shadow Stealth plugin.
- Click the ‘+ Add Component’ button.
- In the search bar in the popup menu type ‘Shadow’.
- From visible components choose the Shadow Light Component corresponding to the Light Component you’ve selected.
Player Setup
The most important class in the Shadow Stealth plugin is ShadowStealthComponent.
Component
For an actor to take advantage of the ShadowStealthCompnent, it has to be attached to another scene component that has some sockets/bones defined. The most natural setup is a Character actor with ShadowStealthComponent attached to the SkeletalMeshComponent. There are multiple ways you can create one.
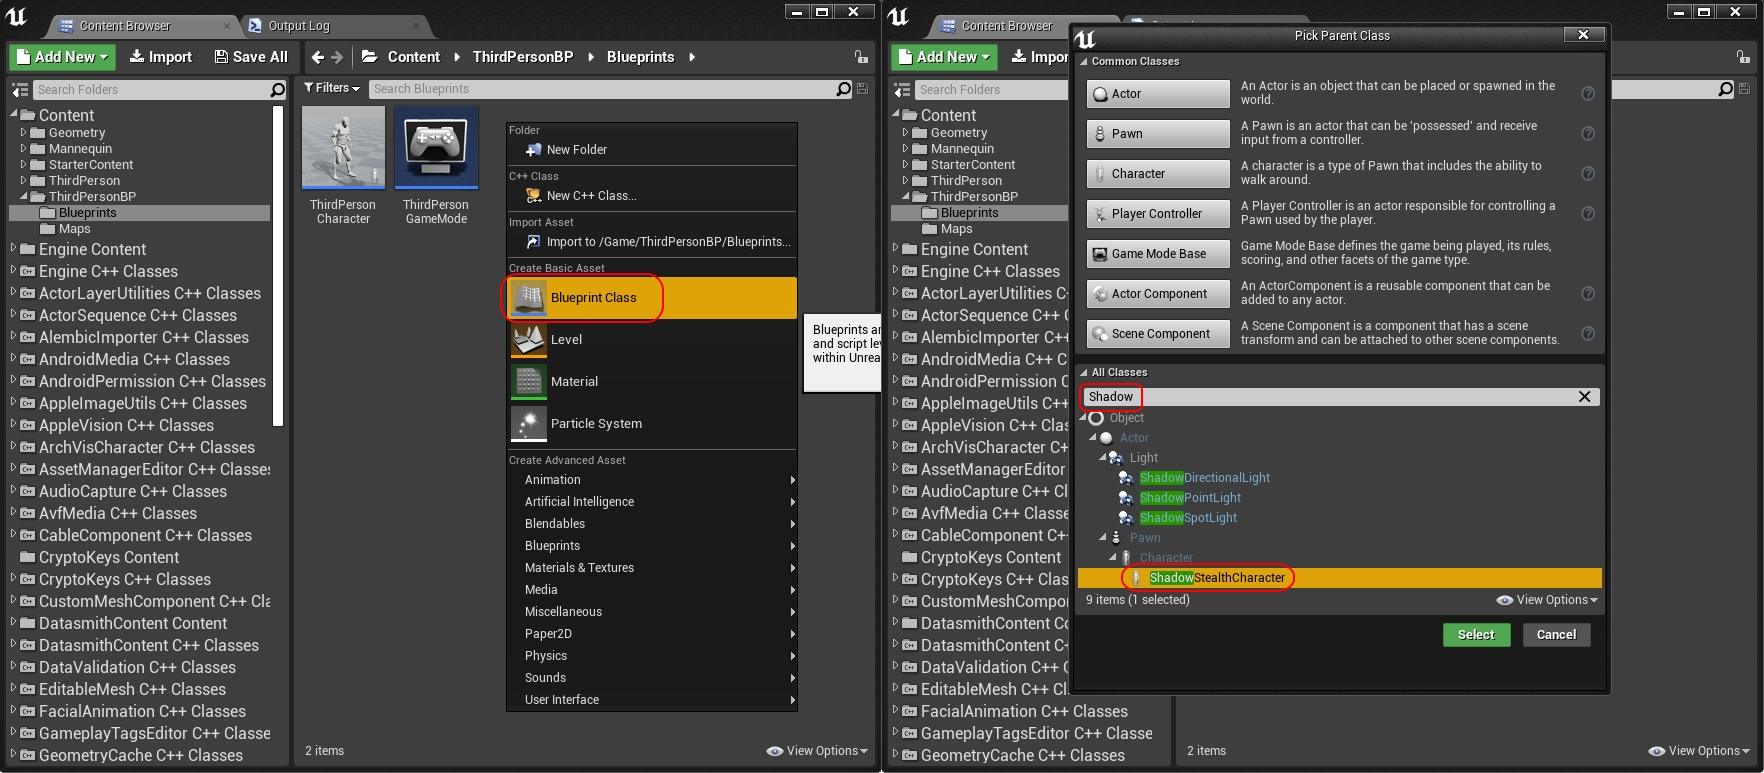
If you’re starting from scratch, you can create a new Character blueprint using ShadowStealthCharacter class as its base:
- Right-click anywhere in the main panel of the ‘Content Browser’.
- From the popup menu choose ‘Blueprint Class’ in the ‘Create Basic Asset’ section.
- In the search bar located in the ‘All Classes’ section type ‘Shadow’.
- From filtered classes choose ShadowStealthCharacter and click the ‘Select’ button.
- Name your new Character blueprint appropriately.
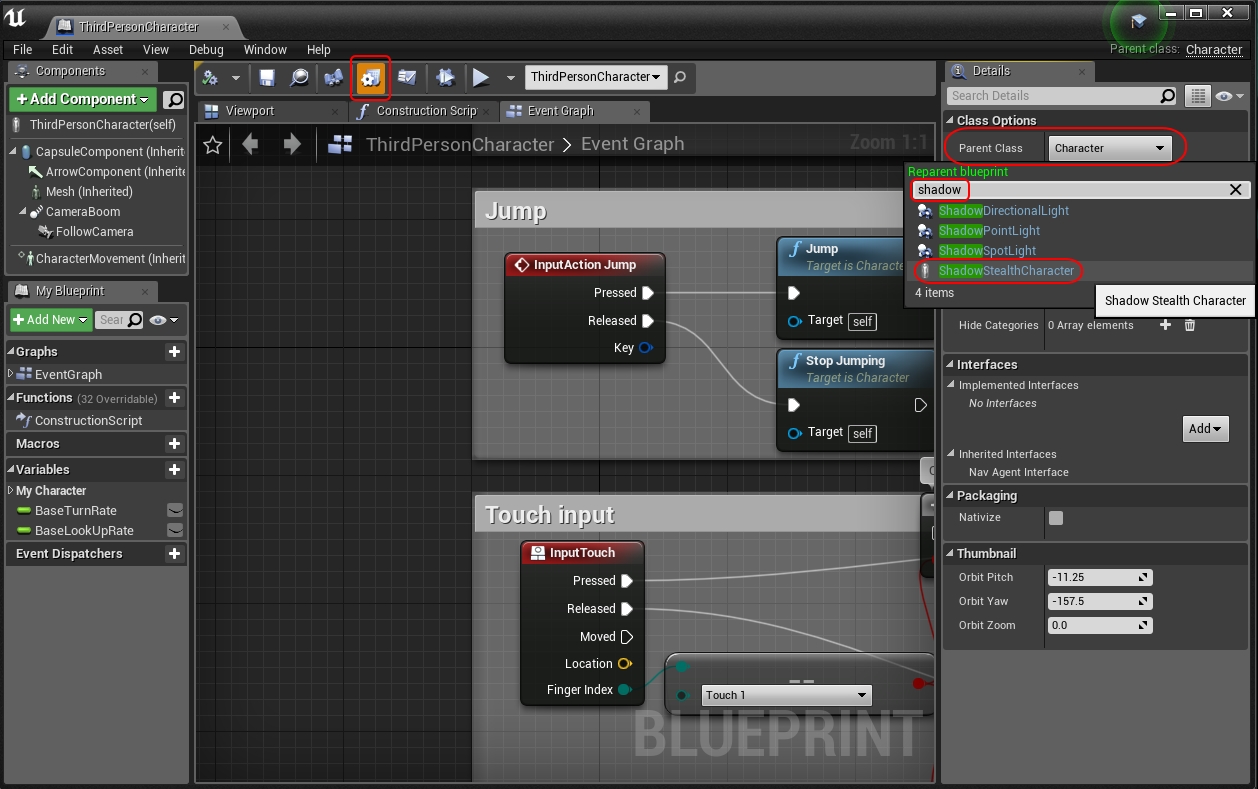
If you have a Character blueprint that derives directly from the Character class, you can just change the parent class to ShadowStealthCharacter:
- Open your Character blueprint in the ‘Blueprint Editor’.
- In the ‘Toolbar’ window click the ‘Edit Class Settings’ button (fifth one by default).
- In the ‘Details’ window click the ‘Parent Class’ combo box in the ‘Class Options’ section.
- In the search bar in the popup menu type ‘Shadow’.
- From filtered classes choose ‘ShadowStealthCharacter’.
If your Character blueprint is a part of a hierarchy of classes with the Character class at its base, you can do the above for the ancestor that derives directly from the Character class. Some other blueprints will unnecessarily have the ShadowStealthComponent, but without ‘Test Sockets’ configured it will be free.
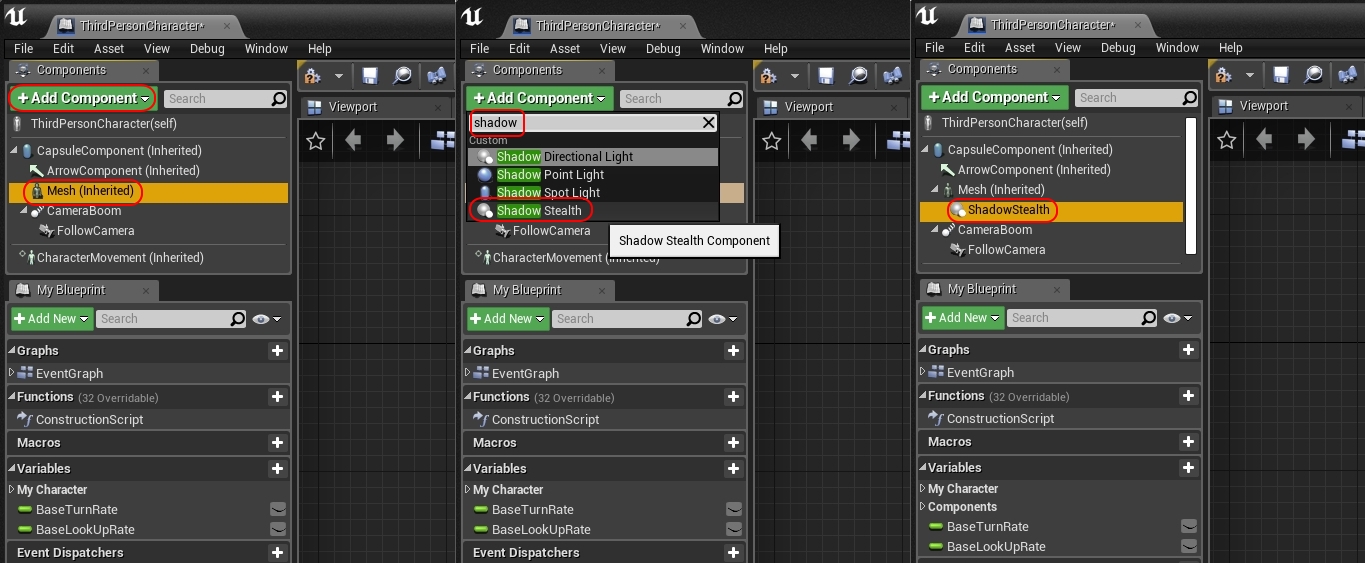
If for some reason, you are unable to derive your character from ShadowStealthCharacter, you can add ShadowStealthComponent to it. The downside is that the AIPerception integration won’t work, because it has to be implemented with an Actor, not a Component.
- Open your Character blueprint in the ‘Blueprint Editor’.
- In the Components window choose the ‘Mesh’ component.
- Click the ‘+ Add Component’ button.
- In the search bar in the popup menu type ‘Shadow’.
- From filtered classes choose the ‘ShadowStealth’ component.
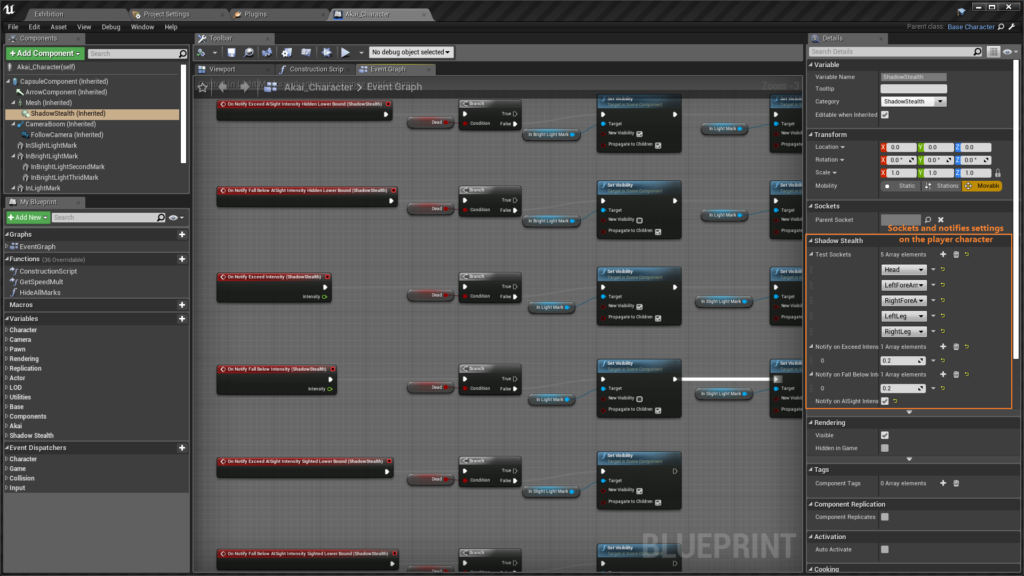
Sockets
By now you should have a Character blueprint with ShadowStealthComponent in it. The next step is to set sockets, from the parent component, that will be tested for light intensity.
- Open your Character blueprint in the ‘Blueprint Editor’.
- In the ‘Components’ window choose the ‘ShadowStealth’ component.
- In the ‘Details’ window locate the ‘Shadow Stealth’ category.
- Click the ‘+’ button next to the ‘Test Sockets’ property.
- Click on the combo box of the new ‘Test Sockets’ element.
- Select the socket/bone you want to participate in light intensity computations.
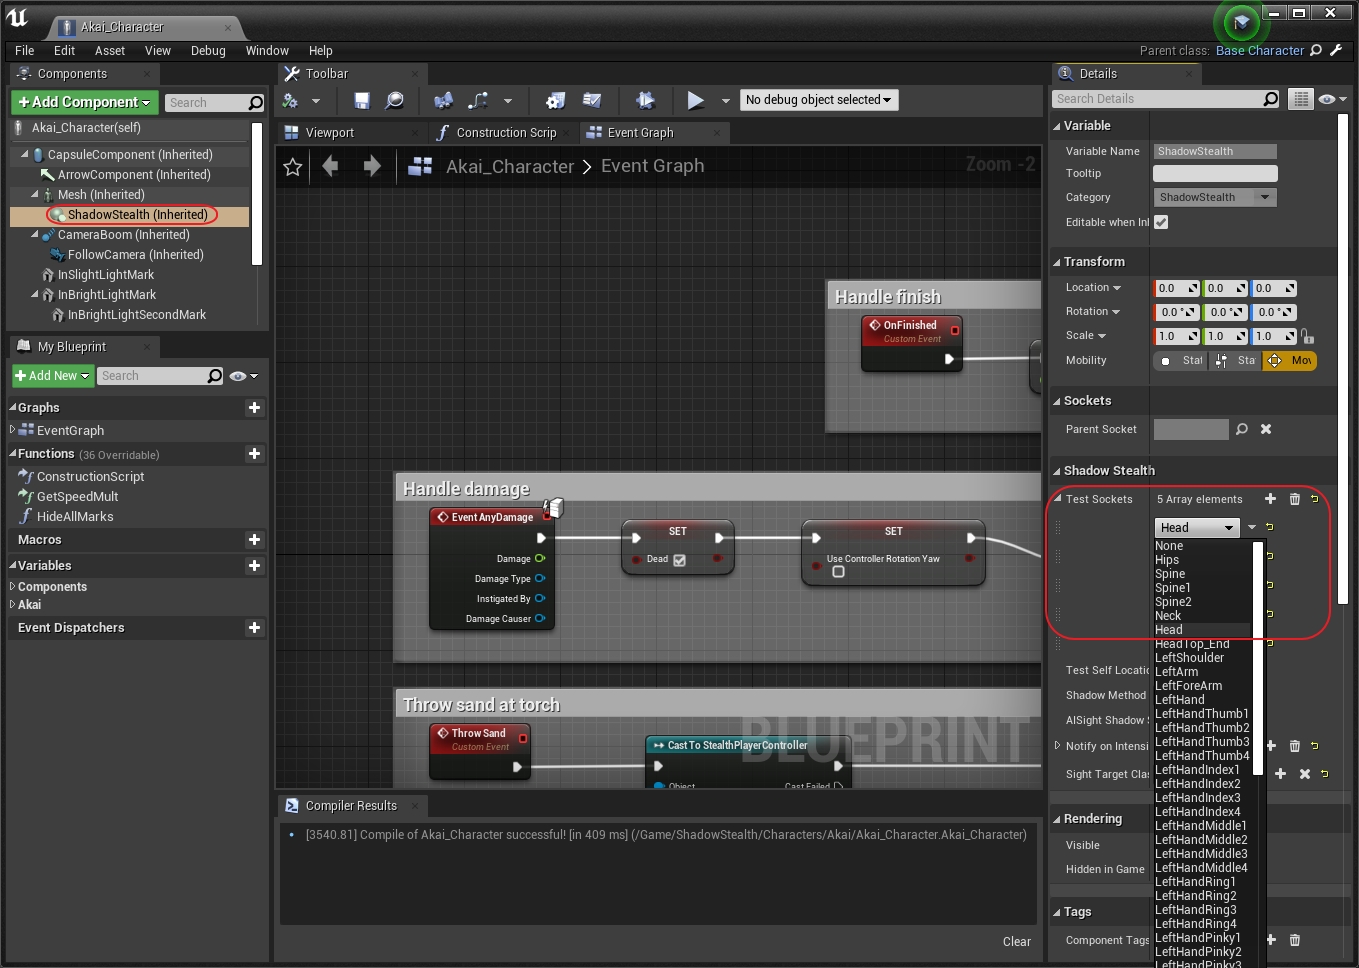
You can choose as many sockets as you want, but remember that each new socket will add to the CPU usage of the Shadow Stealth plugin.
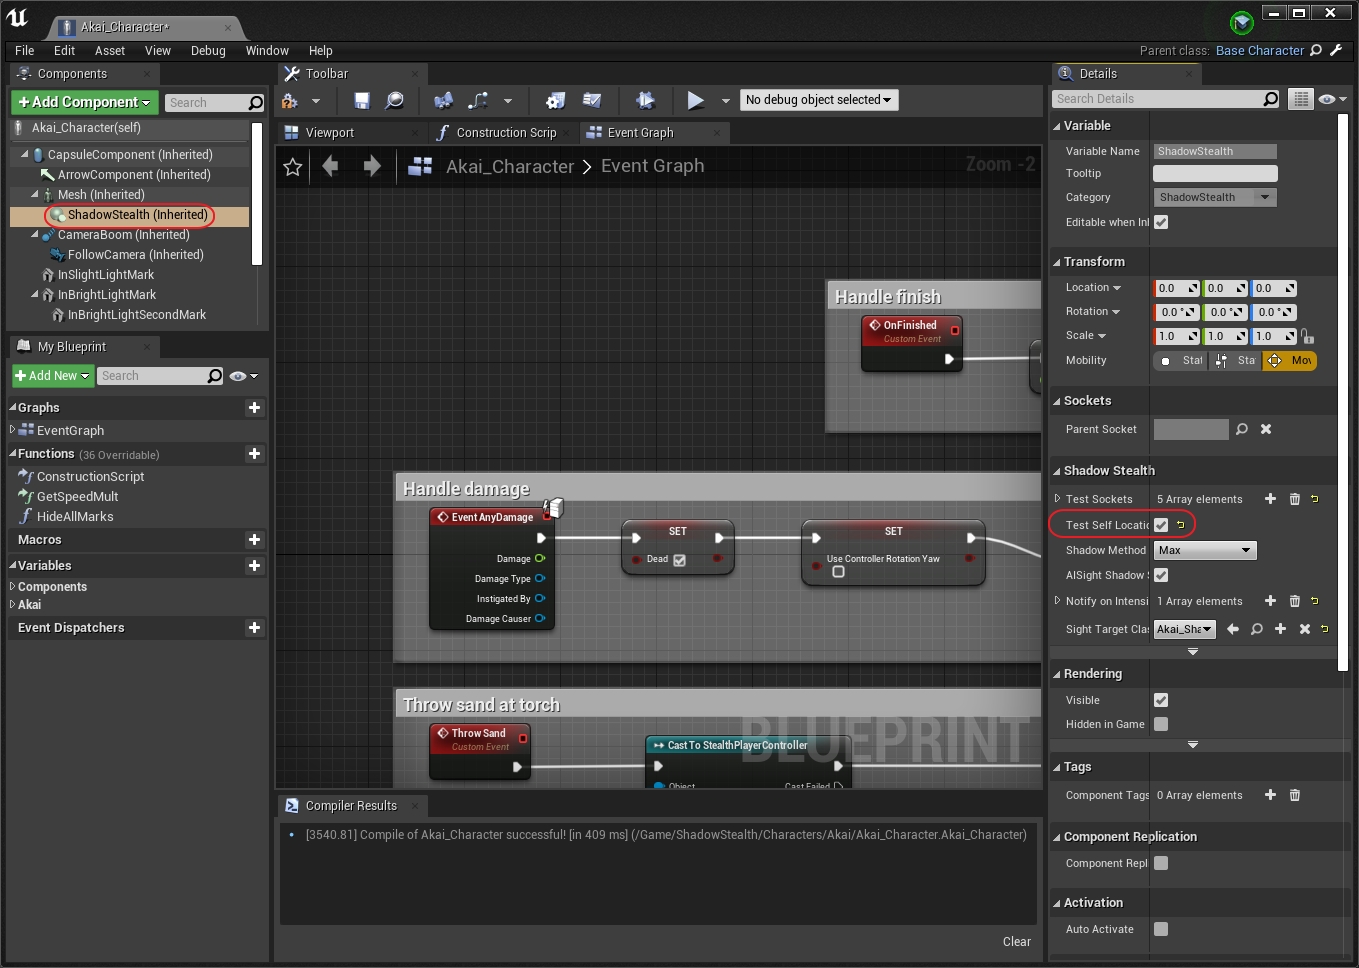
Test Self Location
You can also choose to test the location of the component itself. It will be treated as an additional socket and can be used by itself or with other sockets.
- Open your Character blueprint in the ‘Blueprint Editor’.
- In the ‘Components’ window choose the ‘ShadowStealth’ component.
- In the ‘Details’ window locate the ‘Shadow Stealth’ category.
- Check the ‘Test Self Location’ checkbox.
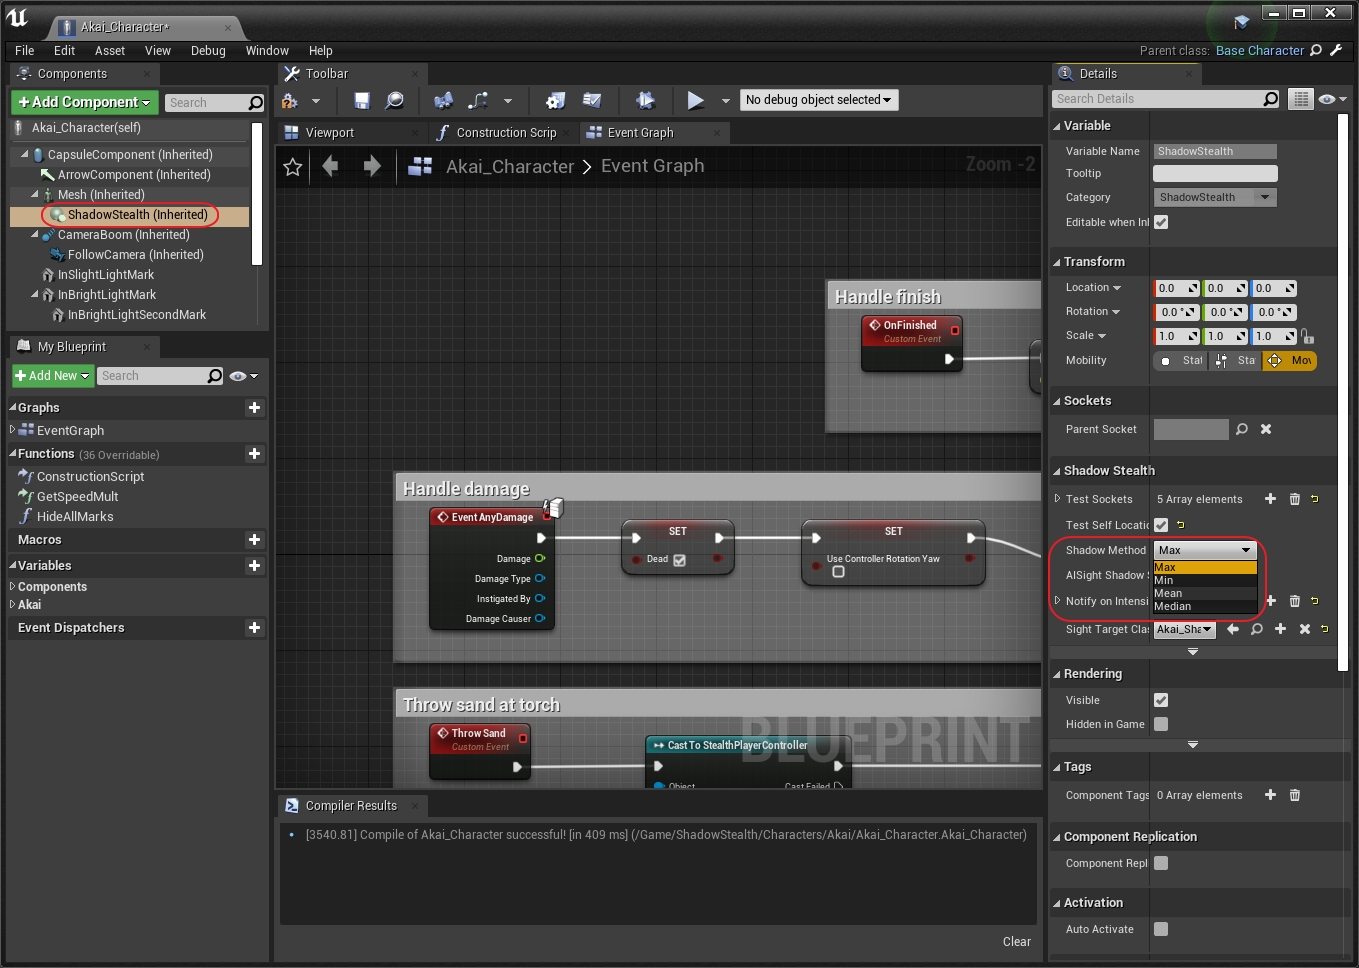
Shadow Method
You can choose the method used to combine all the sockets to produce the light intensity for the whole component. Available methods are:
- Max – maximum value,
- Min – minimum value,
- Mean – mean (average) value,
- Median – median value.
To choose the method you have to:
- Open your Character blueprint in the ‘Blueprint Editor’.
- In the ‘Components’ window choose the ‘ShadowStealth’ component.
- In the ‘Details’ window locate the ‘Shadow Stealth’ category.
- Choose one of the options in the ‘Shadow Method’ combo box.
Blueprint Functions
The main functions exposed to blueprints by the ShadowStealthComponent are:
- ‘Get Light Intensity’ – get combined light intensity at all sockets
- ‘Get Light Intensity at Socket’ – get light intensity at the selected socket
- ‘Get Light Intensity at Self’ – get light intensity at the component location (if ‘TestSelfLocation’ property is set to ‘true’)
- ‘Get Light Intensity RGB’ – get combined per channel light intensity at all sockets
- ‘Get Light Intensity RGB at Socket’ – get per channel light intensity at the selected socket
- ‘Get Light Intensity RGB at Self’ – get per channel light intensity at the component location (if ‘TestSelfLocation’ property is set to ‘true’)
Those functions return light intensity as:
- a ‘float’ value with full light intensity (‘Get Light Intensity’ functions),
- a ‘FLinearColor’ value with red (R), green (R), blue (B) and full (A) light intensities (‘Get Light Intensity RGB’ functions).
There is no set boundary value for distinguishing the shadow from the light. You’ll have to choose one that is appropriate for your lighting, camera, and post-processes setup.
Trace Channel
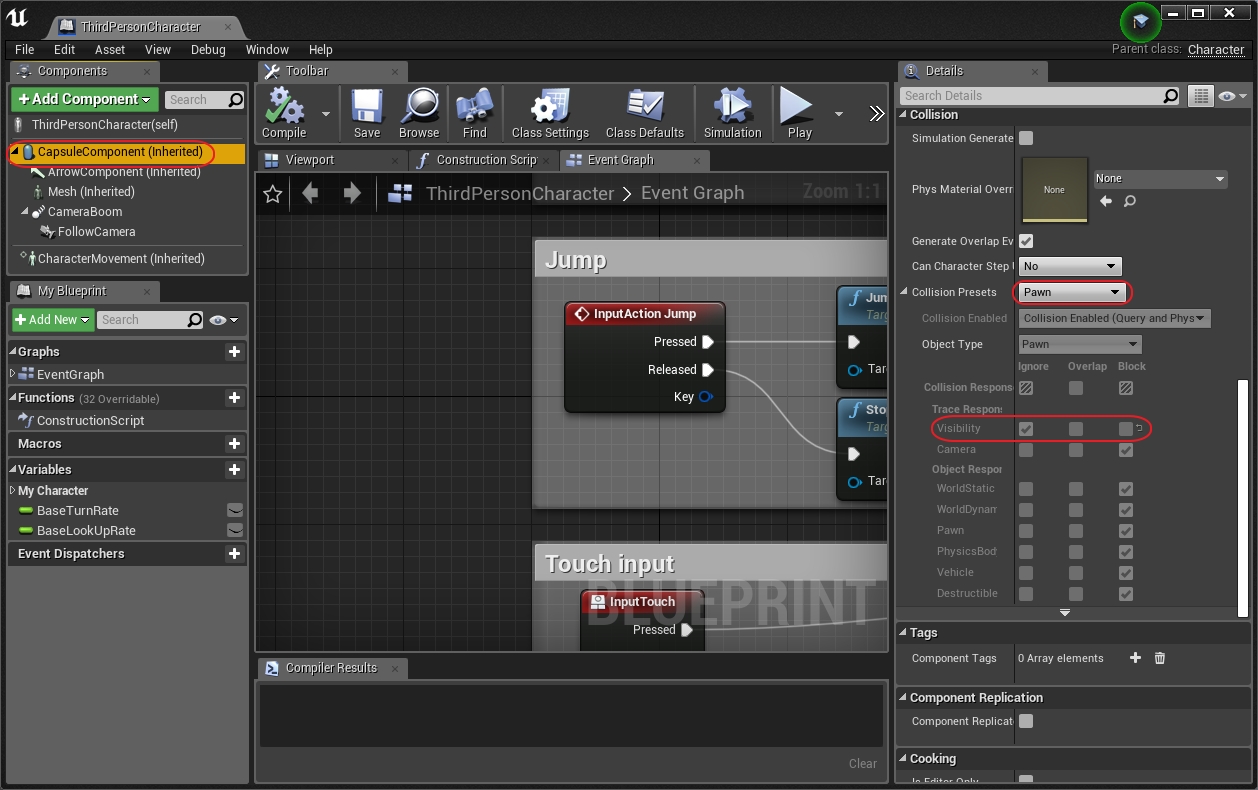
The Shadow Stealth plugin uses traces to determine if a dynamic light reaches the Test Socket on the character. By default ‘Visibility’ trace channel is used.
If you’ll choose to use the default channel, you must make sure that your character does not block the ‘Visibility’ trace channel. This shouldn’t be a problem when using ShadowStealthCharacter or Character classes as a base for your character, because:
- CapsuleComponent uses Pawn collision preset, which ignores the ‘Visibility’ trace channel.
- Mesh uses CharacterMesh collision preset, which also ignores the ‘Visibility’ trace channel.
You can create your own trace channel to allow ignoring meshes that for example don’t cast a shadow:
- Open the ‘Project Settings’ window. You can do this through the ‘Edit’ menu in the menu bar.
- In the ‘Engine’ section in the navigation panel on the left side of the window, choose the ‘Collision’ category.
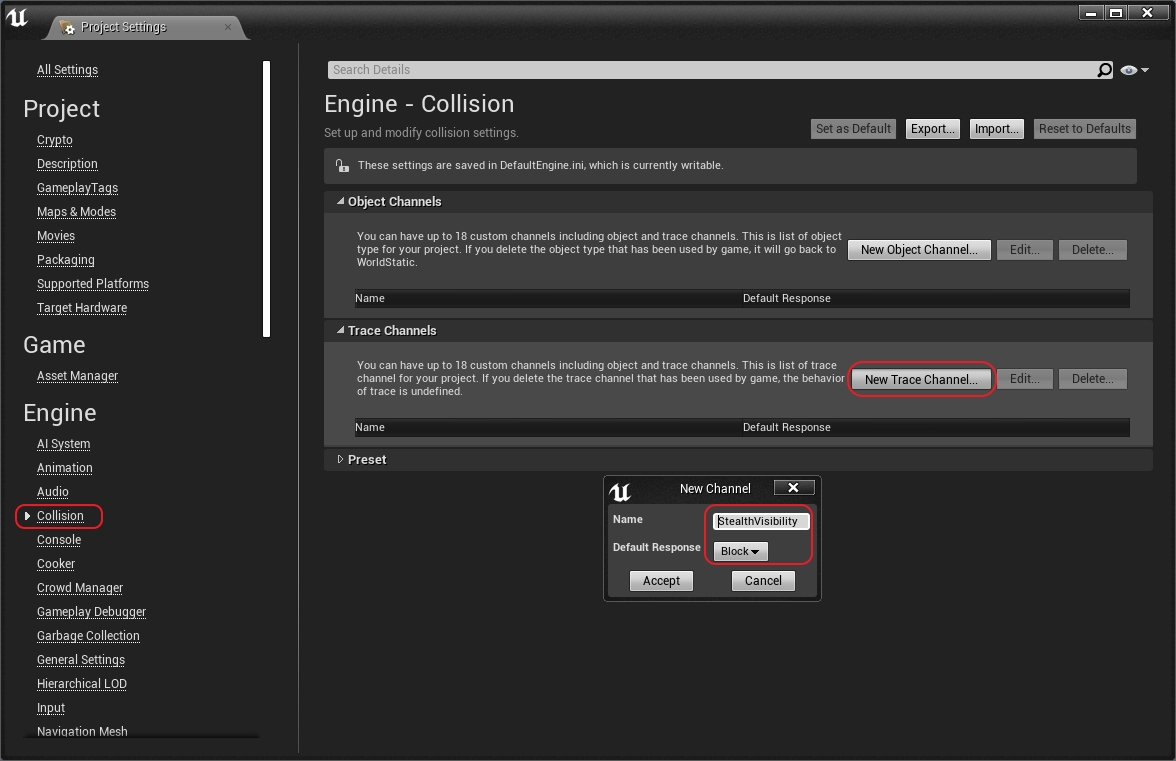
- In the main panel on the right side of the window, click the ‘New Trace Channel…’ button.
- In the ‘New Channel’ type in ‘Name’ (e.g. ‘ShadowVisibility’), select ‘Block’ as ‘Default Response’, and click the ‘Accept’ button.
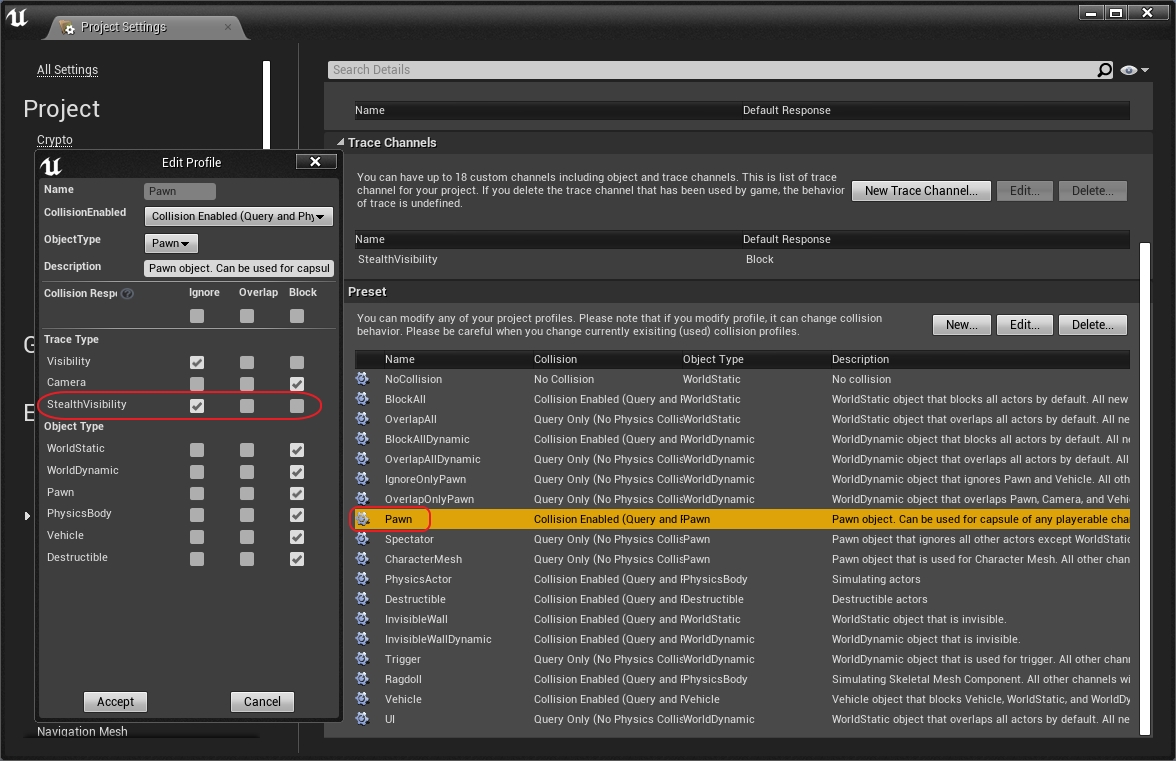
- In the ‘Preset’ category you have to change responses to your new channel in following presets: NoCollision, OverlapAll, OverlapAllDynamic, Pawn, Spectator, CharacterMesh, InvisibleWall, InvisibleWallDynamic, Trigger, and Ragdoll:
- Double-click on a preset.
- In the ‘Trace Type’ category for your new channel check the same checkbox as next to the ‘Visibility’ channel.
- Click the ‘Accept’ button.
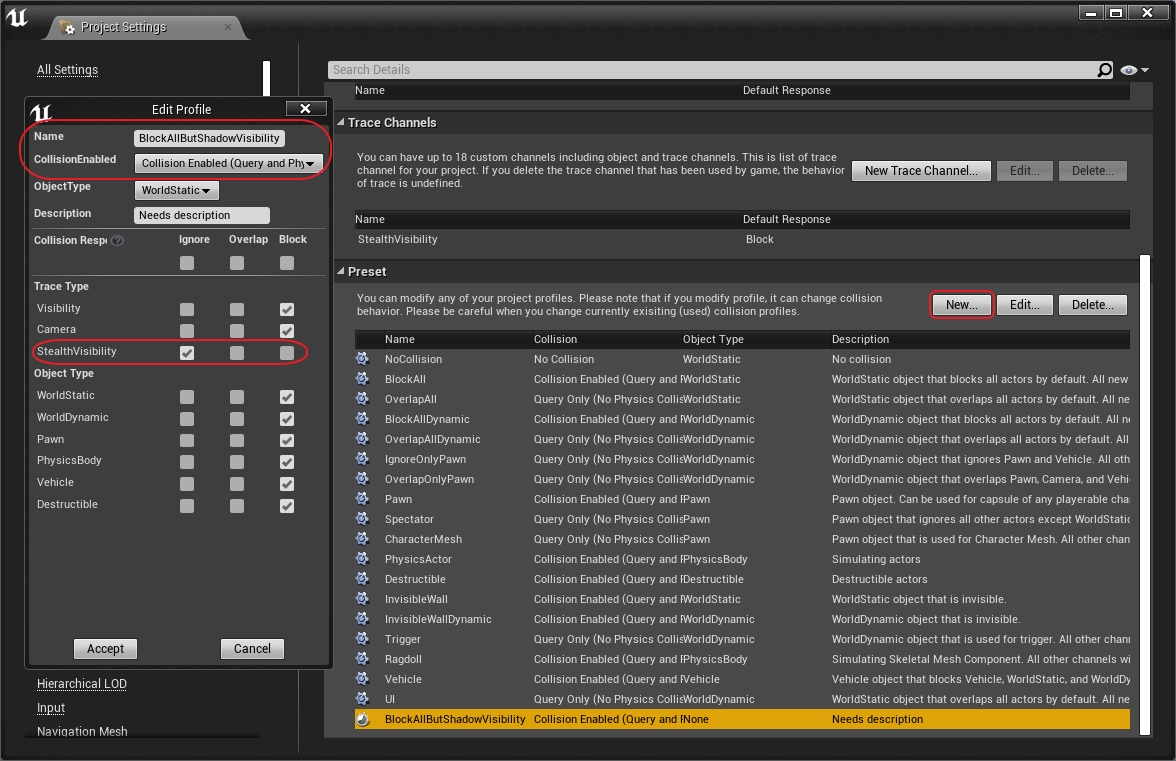
You can also create your own presets based on engine presets, e.g. ‘BlockAllButShadowVisibility’ from ‘BlockAll’:
- Click the ‘New…’ button in the ‘Preset’ section.
- Copy settings from one of the engine presets.
- Type a new name into the ‘Name’ field.
- Set ‘Collision response’ of your new channel to ‘Ignore’.
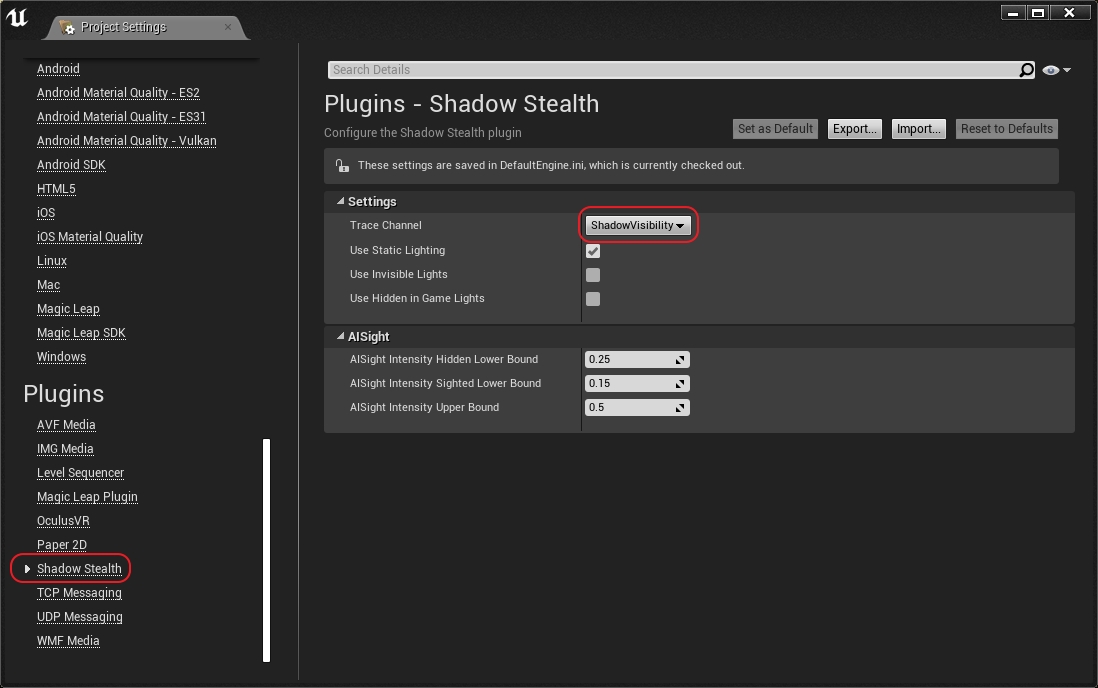
The last thing to do is to change ‘Trace Channel’ used by Shadow Stealth:
- In the navigation panel, on the right side of the window, scroll all the way down to the ‘Plugins’ category and click on the ‘Shadow Stealth’ section.
- In the main panel on the right side of the window, set ‘Trace Channel’ to your new channel.
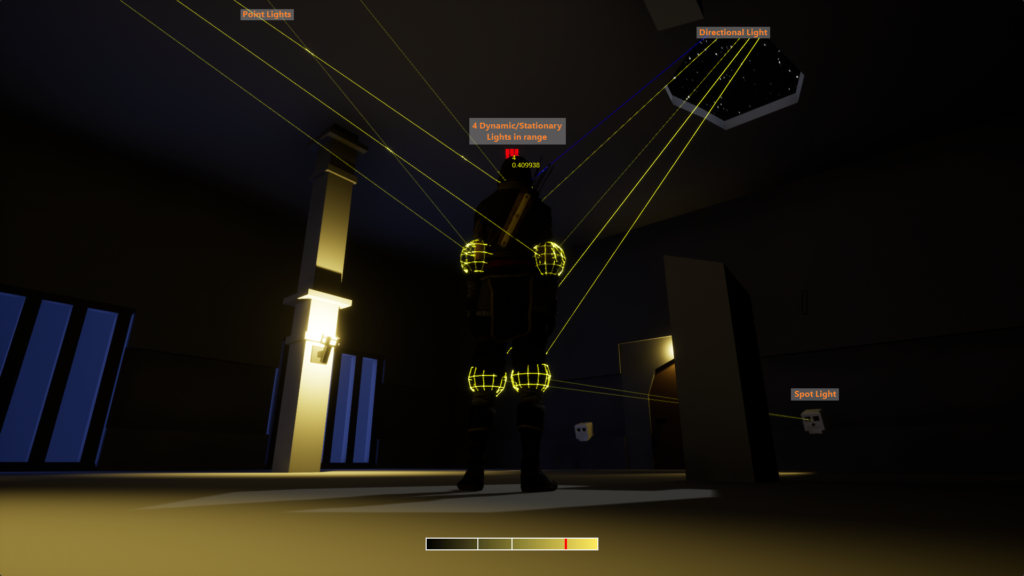
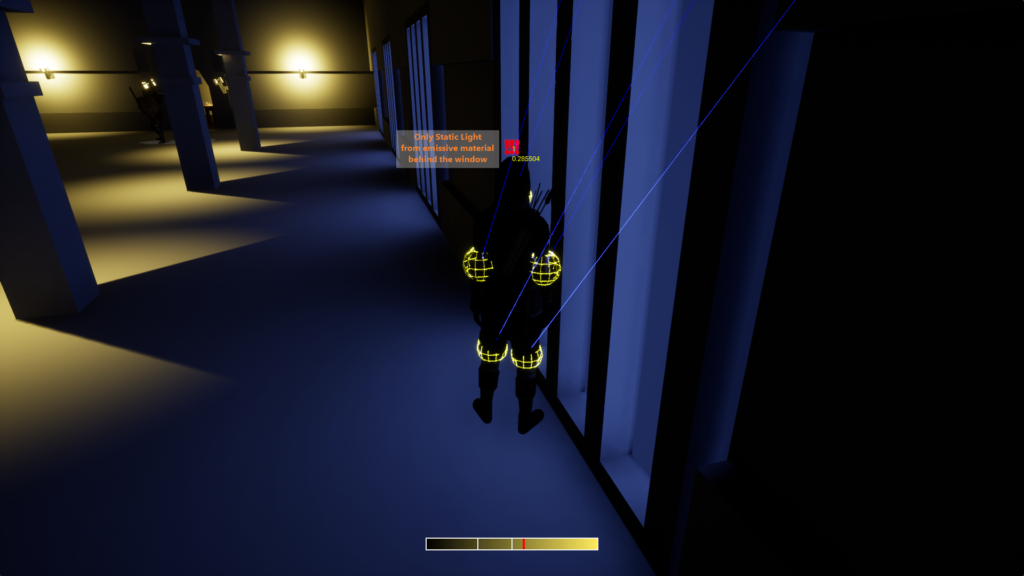
Debug Visualisation
There’s a console variable ‘ShadowStealth.DebugDraw’ that controls debug visualization of ShadowStealthComponent state. Set it to ‘1’ to enable or ‘0’ to disable the visualization. The visualization consists of:
- Integer value, the top one, representing the number of dynamic lights that are currently in the range of the ShadowStealthComponent.
- Floating point value, the bottom one, representing the current maximum light intensity at all sockets.
- Wireframe spheres representing test sockets. Blue means that the socket is completely shaded and yellow means that the socket is lit. If static lighting is used, spheres most likely will always be yellow.
- Lines representing traces from dynamic lights to sockets. Lines are blue when in the shadow and yellow when in the light.
Light Intensity Change Events
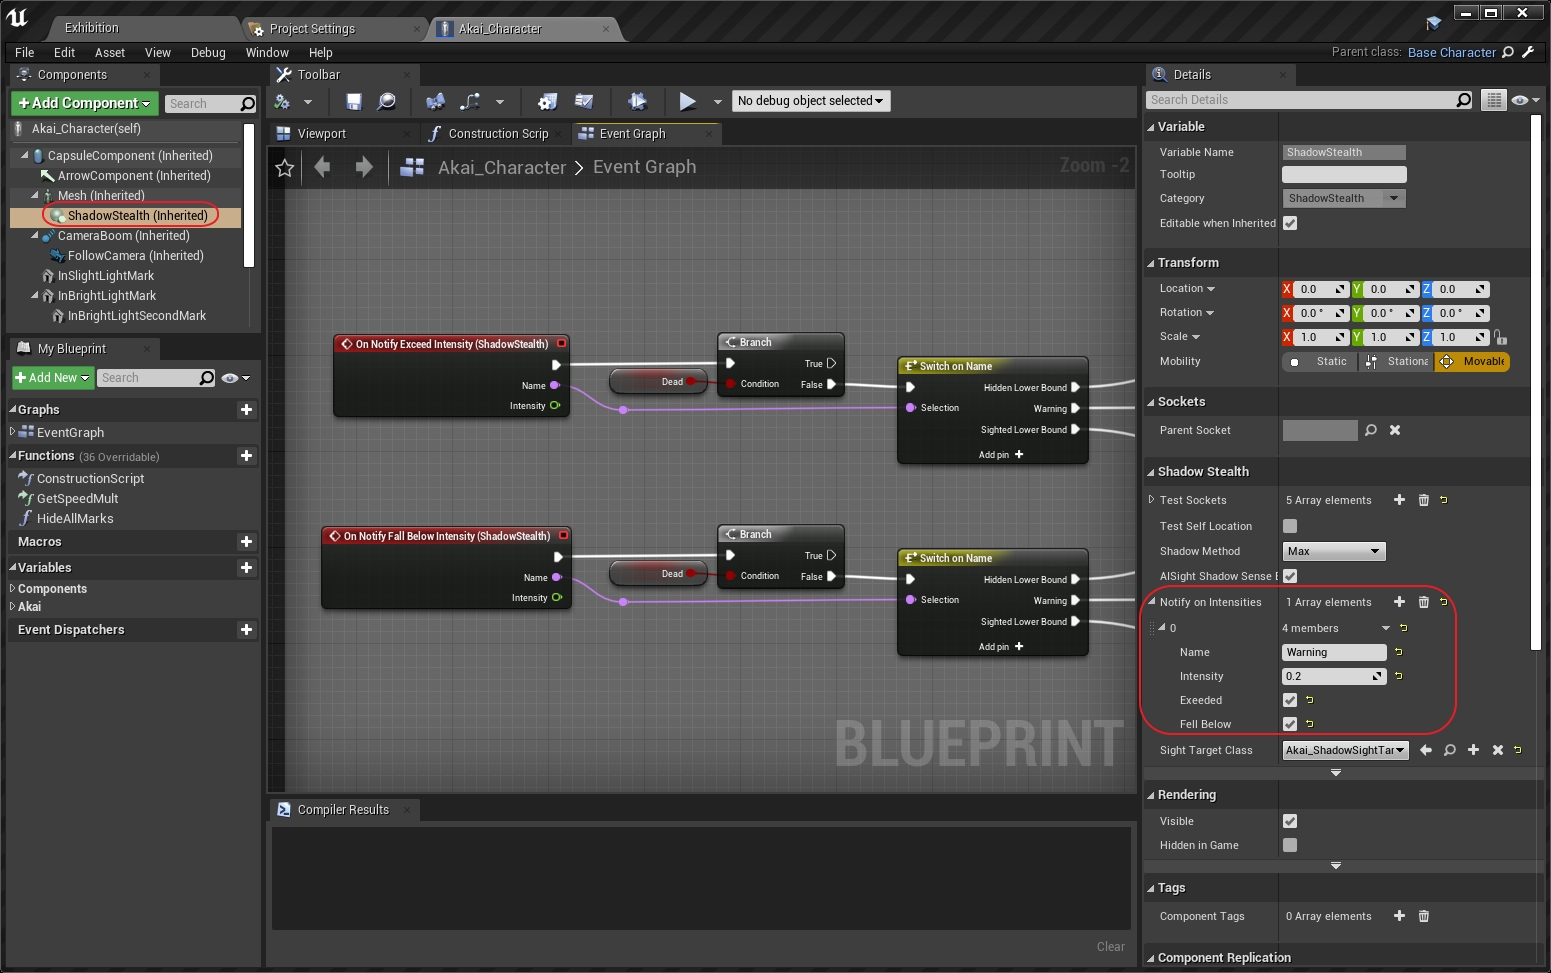
ShadowStealthComponent provides events for light intensity exceeding or falling below defined values. You just have to add light intensity values, you want to be notified about, and names for them to a ‘Notify on Intensities’ array:
- Open your Character in the ‘Blueprint Editor’.
- From the ‘Components’ window choose ShadowStealthComponent.
- In the ‘Details’ window find the ‘Shadow Stealth’ category, and ‘Notify on Intensities’ array property in it.
- Using a ‘+’ button, add some entries to the array. You have to specify:
- ‘Name’ for easy distinguishing the events,
- ‘Intensity’ value that you want to be notified about,
- If the event should be triggered on value ‘Exceeded’, ‘Fell Below’ or both.
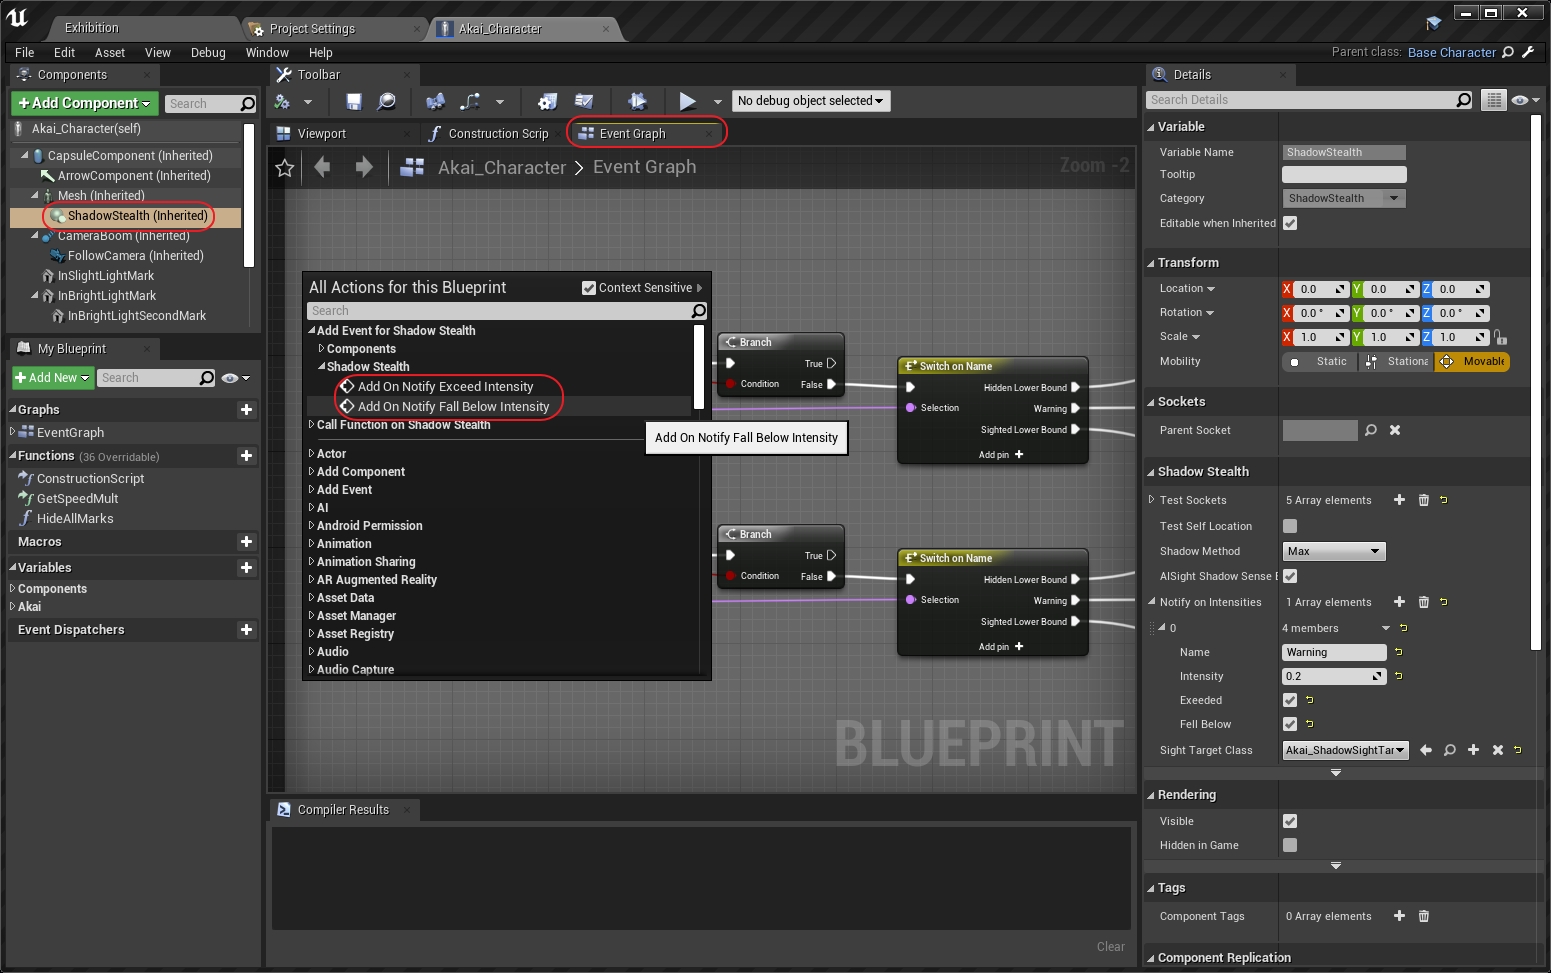
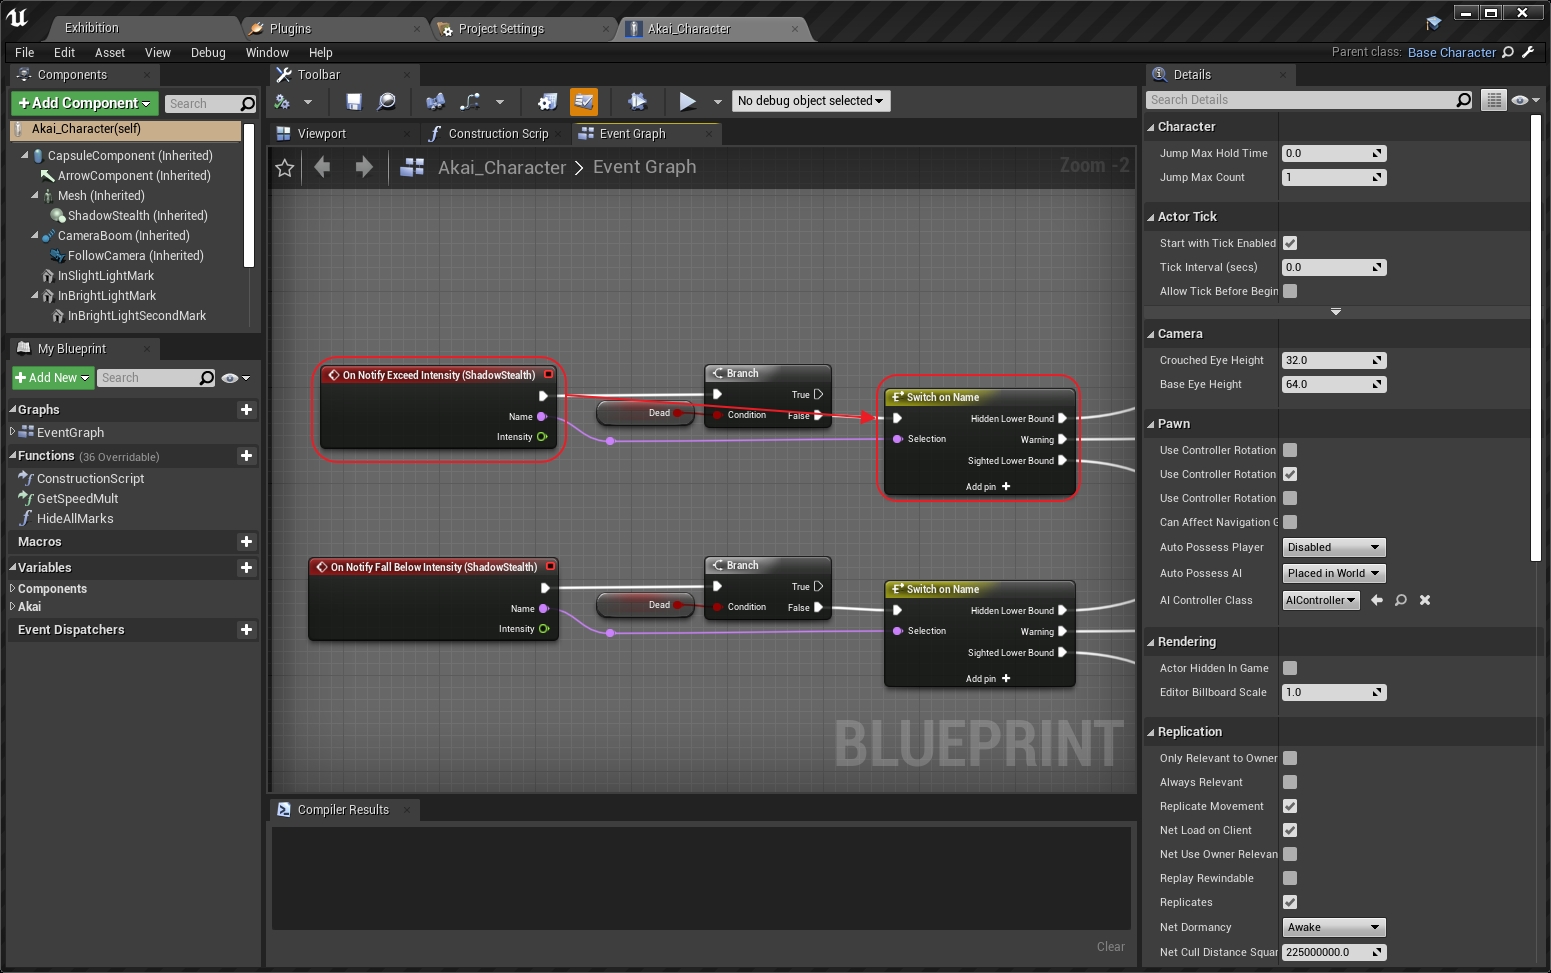
Then you have to handle ‘On Notify Exceed/Fall Below Intensity’ events in your Event Graph:
- With ShadowStealthComponent still selected right-click on the ‘Event Graph’ window.
- In the popup menu expand ‘Add Event for Shadow Stealth’, then ‘Shadow Stealth’.
- Click on ‘Add On Notify Exceed Intensity’ or ‘Add On Notify Fall Below Intensity’.
- The event node has two parameters:
- ‘Name’ of the event,
- ‘Intensity’ value this event was triggered for.
- You can then use the ‘Switch on Name’ node to distinguish the events.
If there is more than one event fired on one frame, they will be fired in order of their intensity value:
- ascending for ‘exceeded’ events.
- descending for ‘fall below’ events.
AIPerception Integration
The AIPerception integration enables an override of the default AISight sense behavior. This is achieved with ShadowSightTargetBase class, which has two implementations provided by the plugin but can also be extended with Blueprint or C++.
Basic Setup
For the AIPerception integration to work, you need your Character class to derive from ShadowStealthCharacter. This is covered in more detail in the Player Setup section above.
The next thing you need is a class extending the ShadowSightTargetBase class. For the start, you can choose ShadowSightTargetIntensityBounds which is provided by the plugin. You’ll need to create a new Blueprint class from it, so you can modify its parameters.
- In the ‘Content Browser’ go to a folder you want to place your class. Next to your Character blueprint should be fine.
- Right-click and from the context menu choose ‘Blueprint Class’ options.
- In the ‘Pick Parent Class’ window expand ‘All Classes’ section and start typing ‘ShadowSightTarget…’.
- From the filtered list select ‘ShadowSightTargetIntensityBounds’.
- Name your new Blueprint.

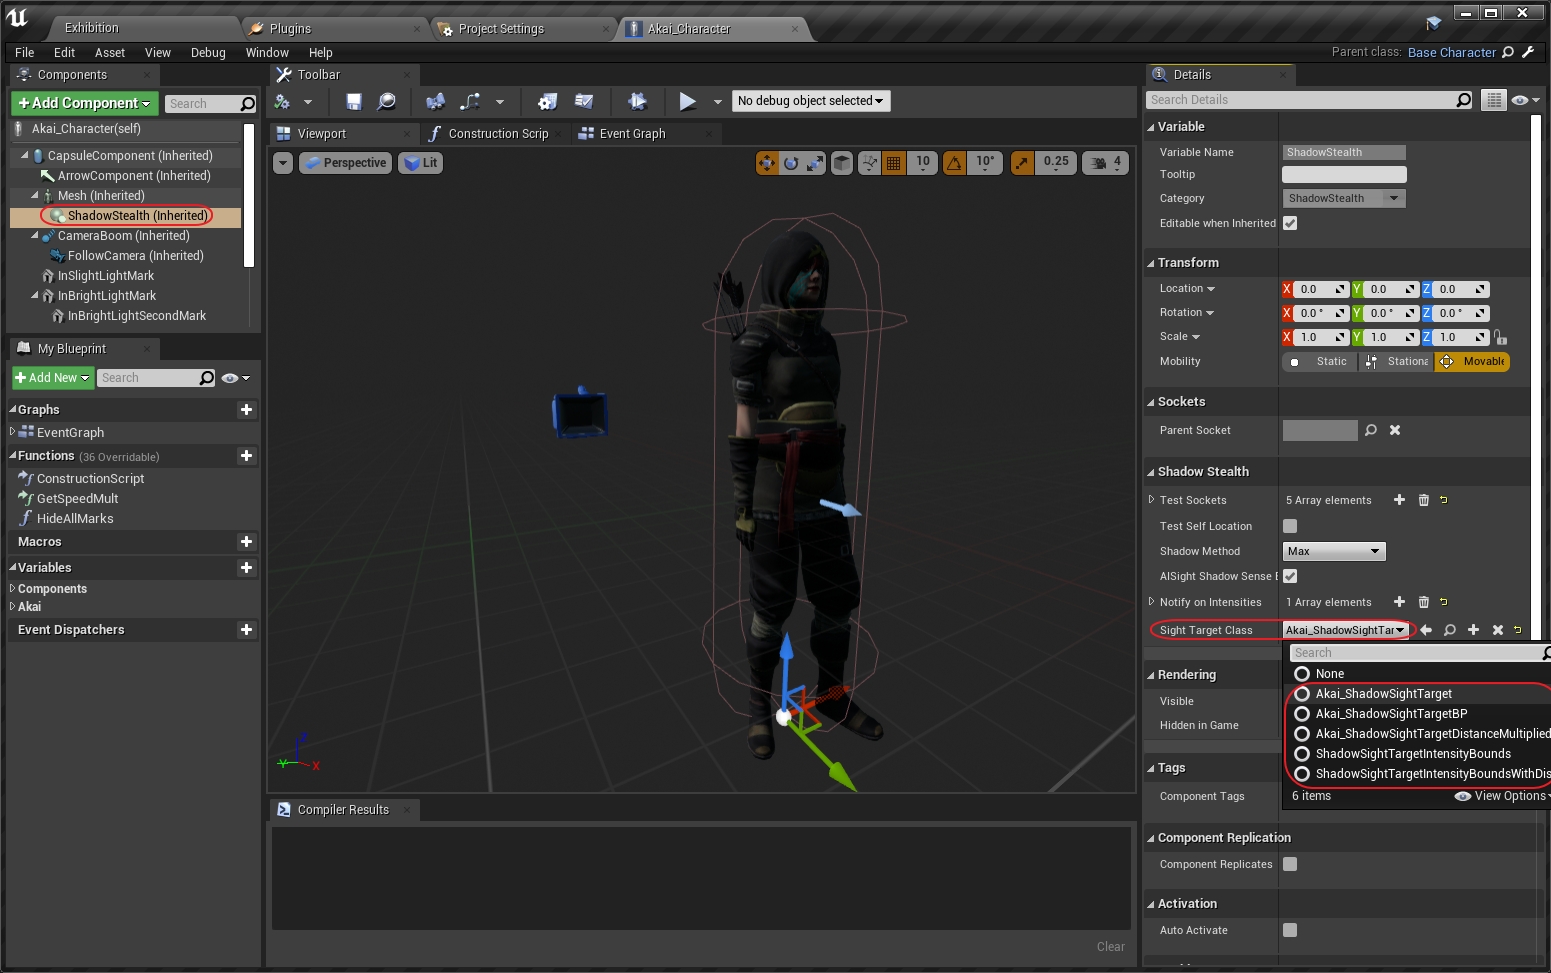
Now you just have to set ‘Sight Target Class’ in the ShadowStealthComponent in your Character.
- Open your Character in the ‘Blueprint Editor’.
- From the ‘Components’ window choose ShadowStealthComponent.
- In the ‘Details’ window find the ‘Shadow Stealth’ category, and ‘Sight Target Class’ property in it.
- From the combo box choose your Blueprint class.
ShadowSightTargetIntensityBounds
What this class does is, instead of one trace to the center of an actor and binary stimuli strength (0.0 or 1.0), it:
- Performs a trace for each test socket on ShadowStealthComponent.
- From all sockets that passed the trace test the one with the highest light intensity is chosen.
- The light intensity is normalized to a range defined in the settings (more about that later).
- If the normalized light intensity is greater than 0.0, the actor is in sight and the light intensity is used for stimuli strength.
The light intensity range can be configured in a blueprint extending the ShadowSightTargetIntensityBounds class (created in the previous section). There are three values:
- ‘Intensity Hidden Lower Bound’: used as the lower bound of the range when the owner of the AIPerception component has no knowledge about player whereabouts.
- ‘Intensity Sighted Lower Bound’: used as the lower bound of the range when the owner of the AIPerception component has seen the player lately (has active AISight stimuli).
- ‘Intensity Upper Bound’: used as the upper bound of the range.
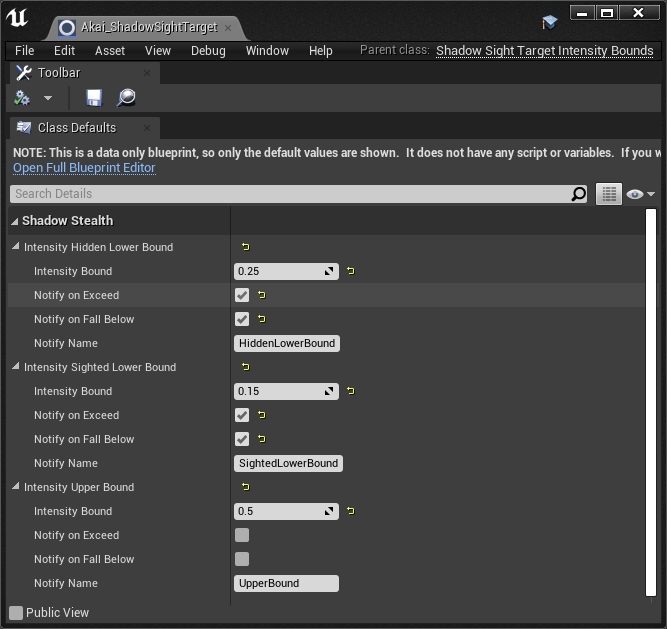
For each of the three values, you can also enable notification events for the light intensity exceeding and/or falling below the intensity bound. There’s also a customizable notification name for each value. The events are handled in blueprint exactly the same as the events defined directly in ShadowStealthComponent (see Light Intensity Change Events section above).
Custom ShadowSightTargetBase Subclass
You can implement your own ShadowSightTargetBase subclass. There is just one mandatory function to override and one that is optional.
The best reference for your own implementation is Akai_ShadowSightTargetBP blueprint class you’ll find in the example project. It implements the same exact behavior as ShadowSightTargetIntensityBounds.
CanBeSeenFrom
This function checks if your Character can be seen from the point of view of an observer actor. It has four inputs:
- ‘Shadow Stealth’ – a ShadowStealthComponent you’re performing the test for,
- ‘Observer’ – an observer actor that is trying to spot your Character,
- ‘Observer Location’ – point of view location of the observer,
- ‘Seen Last Time’ – was your Character seen by this observer in the last check.
There are also three outputs:
- ‘Out Seen Location’ – the location that the observer has spotted your Character in,
- ‘Out Sight Strength’ – sight stimuli strength in a range from 0.0 to 1.0, can be interpreted by the observers AI,
- ‘Return Value’ – a boolean value answering the question: can the character be seen from the point of view of the observer.
Aside from the basic ‘Get Light Intensity’ and ‘Get Light Intensity RBG’ functions, ShadowStealthComponent provides some additional ones that can be of use for your implementation:
- ‘Check Line of Sight’ – check line of sight for the ‘Observer’ from ‘ObserverLocation’ to ‘SightTargetLocation’.
- ‘Get Sockets Num’ – get the number of sockets so you can iterate on them using indices instead of names (this includes the virtual socket created for ‘Test Self Location’ feature). Indices start at 0.
- ‘Get Light Intensity at Socket Index’ and ‘Get Light Intensity RGB at Socket Index’ – get the light intensity at the socket by its index.
- ‘Get Location at Socket Index’ – get the location of the socket by its index.
GetIntensityNotifiers
This function can be useful for adding light intensity change events for intensity values used by your ShadowSightTargetBase implementation.
The only function you should be calling from this one is ‘Add Intensity Notifier’ with four parameters:
- ‘Notifier Name’ for easy distinguishing the events,
- ‘Notifier Intensity’ value that you want to be notified about,
- ‘Notifier Exceeded’ and ‘Notifier Fell Below’ for choosing which events should be triggered.
This function is provided by ShadowSightTargetBase class and should be called only inside the ‘Get Intensity Notifiers’ function.
Deprecated implementation
There are some leftover properties, functions, and settings from the old and now deprecated AIPerception integration implementation. These are left for an easier transition to the new ShadowSightTargetBase based system. They will be purged in a following update.
Everything with ‘AISight’ in its name should be ignored by the new users and swiftly abandoned by the ones that used it already.
Additional Features
Enable/Disable Light
If you want to disable stationary or movable LightComponent during gameplay you can set its:
- ‘Visible’ property to ‘false’,
- ‘Hidden in Game’ property to ‘true’.
Shadow Light Components will abide by those properties set on their parents. You can change this behavior by changing one of the following Shadow Stealth plugin settings:
- ‘Use Invisible Lights’ – use light components with ‘Visible’ property set to ‘false’.
- ‘Use Hidden in Game Lights’ – use light components with ‘Hidden in Game’ property set to ‘true’.
If you want to disable Shadow Light Component directly, you can set its ‘Enabled’ property to ‘false’.
May I ask how I can make an enemy ignore the plugin and see players even if they are hiding in the shadow?
Hi Lip.
If you don’t want to make use of AIPerception integration altogether, make sure to set ‘SightTargetClass’ to None and ‘AISightShadowSenseEnabled’ to false on your ShadowStealthComponent.
If you want just some enemies to ignore light intensity information, you can create a blueprint (or C++) subclass of ShadowSightTargetIntensityBounds and override ‘CanBeSeenFrom’ function. You can check the enemy type with the ‘Observer’ parameter and:
– call to parent function for enemies that don’t see in the dark,
– for other enemies call ‘CheckLineOfSight’ function on ShadowStealth parameter, and if it returns true return location of your character, sight strength of 1.0 and true, otherwise return zero location, sight strength of 0.0 and false.
Hey is there any way you can incorporate the last seen location in your shadow stealth plug-in example project? Maybe for when the enemy sees you and and the !! mark turn yellow for a period of time then the enemy searches that spotted location for a certain time period ? Or maybe make a video on how to add that to the example project games like splinter cell have this feature and you wrote about it having that function above, so I just thought it would be nice if you included it in the example or made a video or maybe just expand your pdf to how that should be implemented. Sorry for going on a tangent but other than that I think your system is great and that you did a fantastic job already.
Hi Adam, thanks for your kind words, I really appreciate it 🙂 As for extending the example project with the last seen location, I will look into it if I will find some time. However, it could be a while as I’m currently invested in other projects. You could always look into some other tutorials on this subject. It shouldn’t be any different with or without my plugin.
Hey, can you set it up so that the ShadowStealth component can be deactivated to make a character visible in shadows all the time, or reactivated to resume the tracing behavior? Thanks.
Hi Scott. One way of doing this would be to copy Akai_ShadowSightTargetBP from the ShadowStealthExample project and change CanBeSeenFrom function implementation. You can set the LowerBound local variable to -1 when you want the character to be always visible.
Hey, is there any way to keep AIPerception integration without deriving from ShadowStealthCharacter? I prefer to use my own character base class, but need the AIPerception integration
Hi Vaani. This is necessary because the Character class has the function that needs to be implemented for the integration to work. You can always make ShadowStealthCharacter the base class of your Character base class. This is covered in the documentation above. You can also drop on to my discord server if you need help with this 🙂
It’s not covered for C++, though. My character base class is in C++, and trying to derive from ShadowStealthCharacter in C++ seems to not be working
It should work just fine. When you derieve from ShadowStealthCharacter in C++, does your character have the ShadowStealthComponent? If not, do you properly call base class constructor from your constructor?
I can’t even get the plugin’s header files to include in my own. The whole thing is very strange
This has been resolved! Thanks for all the help!