Description
Tick Optimization Toolkit optimizes ticks in actors, components, and timelines by reducing their frequency or disabling them with distance and visibility. All the features are easily accessible from Blueprints. No C++ knowledge is needed.
No more need for spawning and despawning actors that would otherwise fit into memory. No more juggling of triggers and volumes that above all obfuscate your levels in the editor. With Tick Optimization Toolkit, you can gain precious milliseconds of game thread time with ease.
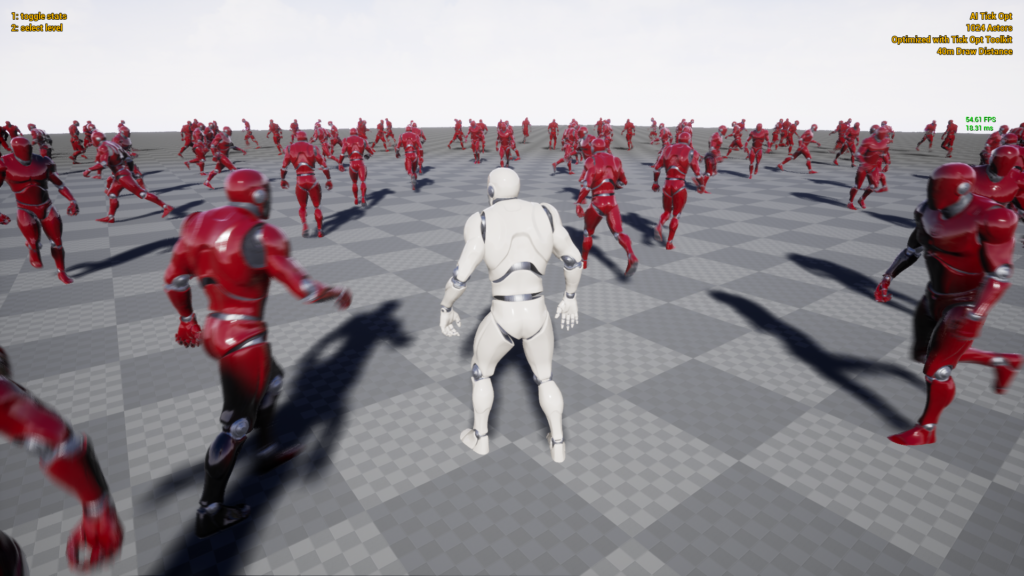
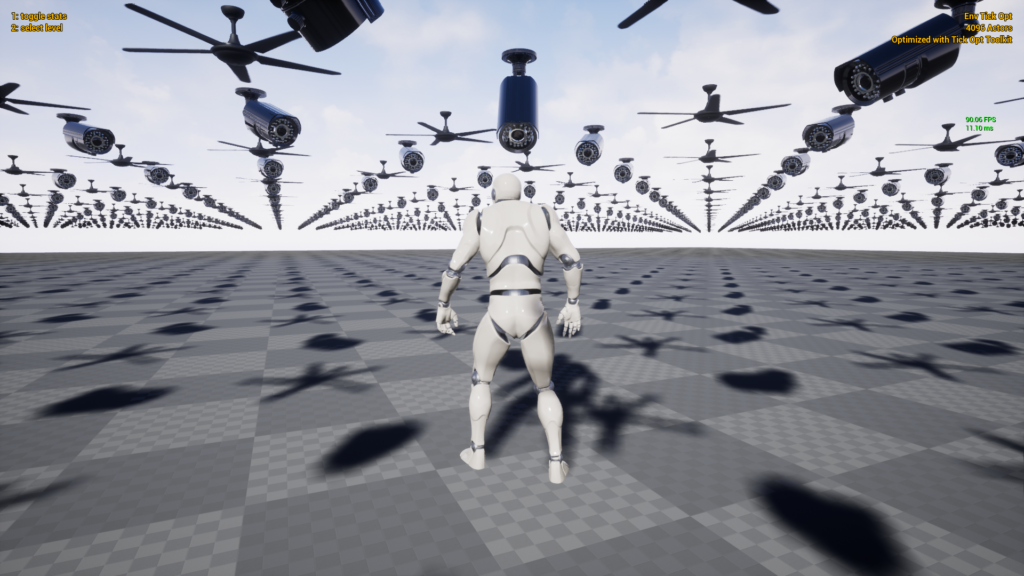
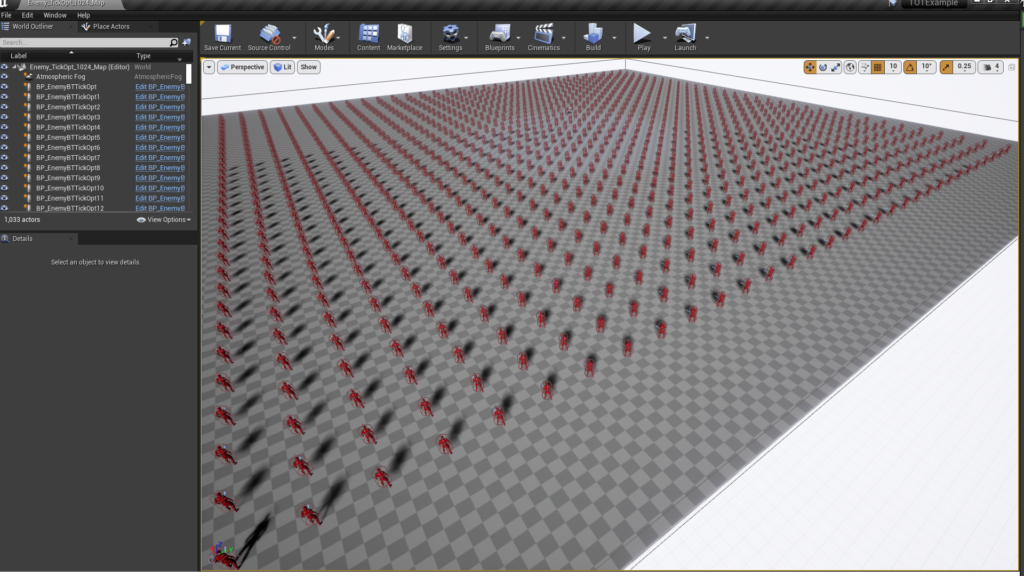
For some concrete numbers, you can look into the example. Results on my machine are:
- for 1024 AI Characters from 9 FPS (108 ms) to 55 FPS (18 ms)
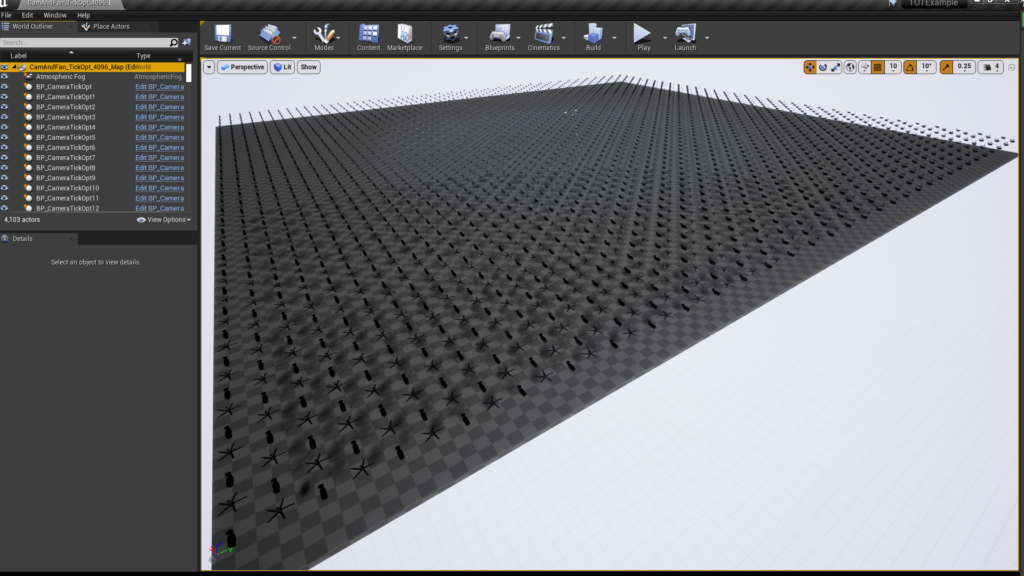
- for 4096 Environment Actors from 20 FPS (48 ms) to 80-220 FPS (4 ms, GPU bound)
Features
- Optimizes everything that ticks in an actor: components, timelines, and the actor itself.
- Can handle thousands of actors with ease.
- Works with any actor: pawn, controller, projectile, moving, stationary, etc.
- Evenly distributes ticks between frames.
- Can easily be incorporated into an existing project.
- Supports multiplayer: local, online (with listen or dedicated server).
- All the features are easily accessible from Blueprints and C++.
- Additionally, exposes animation update rate optimizations to blueprints.
Gallery
Downloads
Example project:
Video Tutorials
Changelog
1.4.0
- Add tick interval balancing.
1.3.0
- Add scalability features: optimization levels, distance scale (tick), and screen-size scale (URO).
- Add Nintendo Switch support.
- Make TickOptToolkitTargetComponent and TickOptToolkitAnimUpdateRateOptimizationComponent blueprintable, which enables creating optimization presets.
- Disable tick in all components available in the plugin.
1.2.0
- Add focus layers feature.
1.1.1
- Update for UE 5.0 EA and git branches: 5.0, UE5-main.
1.1.0
- Add TickOptToolkitMimicComponent for mimicking optimizations of another actor (useful for AI Controller mimicking its Pawn).
- Fix packaging BP-only project.
1.0.2
- Improve handling of ‘Start with Tick Enabled’ property.
- Improve handling of timelines.
1.0.1
- Block Niagara/Cascade components from being tick controlled.
Documentation
Introduction
Tick Optimization Toolkit plugin allows you to scale the ticking frequency of an actor based on its distance to the player and its visibility. For each actor you want to optimize, you can configure multiple zones that, with increasing distance, will increase the tick interval and possibly disable ticking altogether in the most distant zone. This way, you can have thousands of ticking actors on your scene and pay the cost of ticking just a fraction of them each frame.
Basic usage
Enable Plugin
To use Tick Optimization Toolkit plugin, you have to enable it first:
- Open the ‘Plugins’ window. You can do this through the ‘Edit’ menu in the menu bar.
- In the navigation panel, on the right side of the window, select the ‘Gameplay’ group from the ‘Installed’ section.
- In the list of plugins, on the left side of the window, find the ‘Tick Optimization Toolkit’ plugin.
- Make sure that the plugin is marked as ‘Enabled’. You will have to restart the editor for this change to take effect.

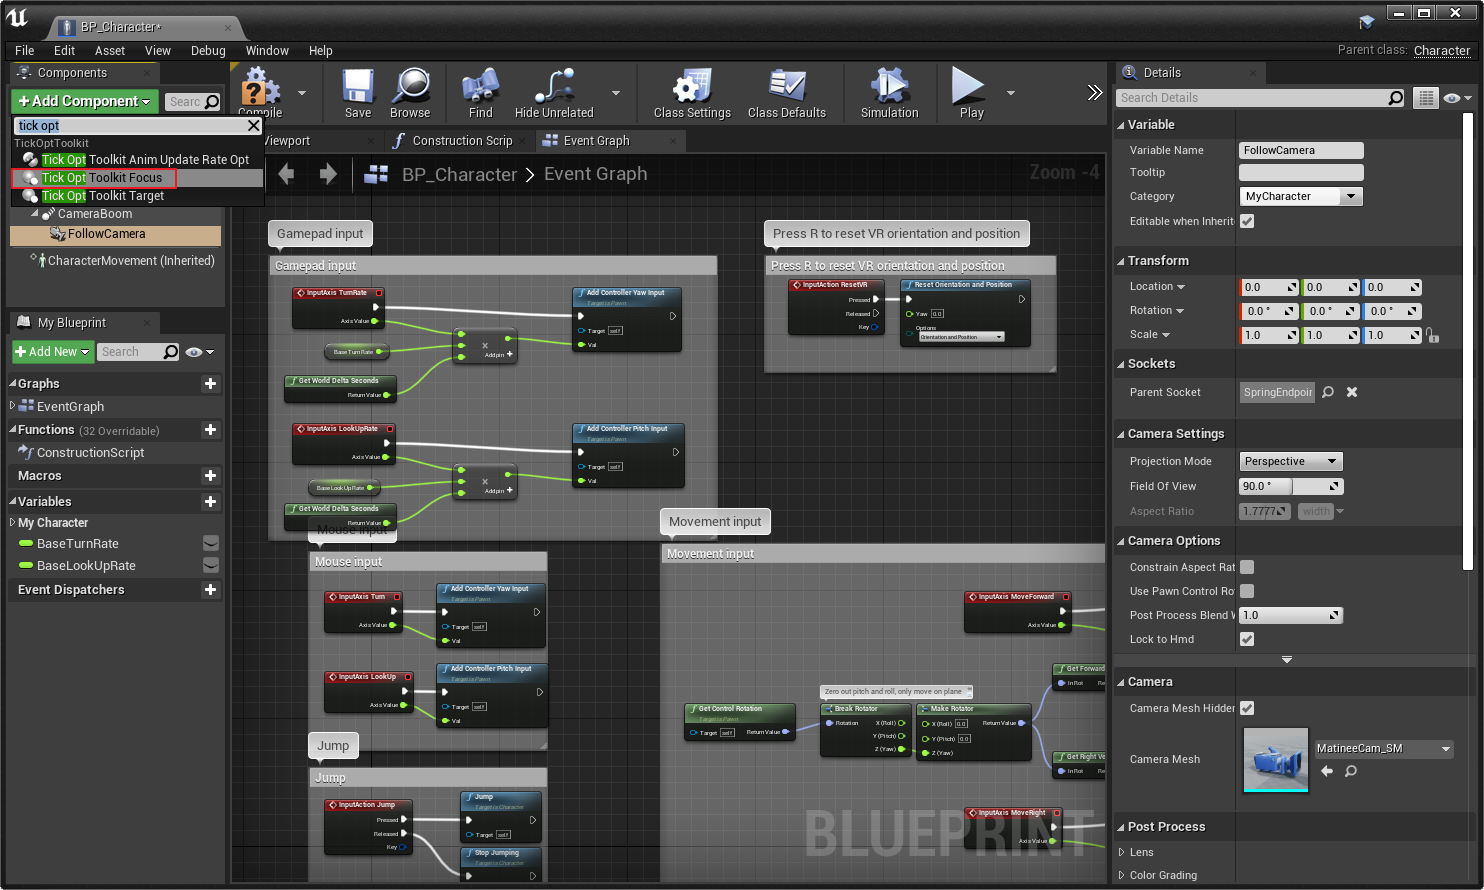
Setup Player
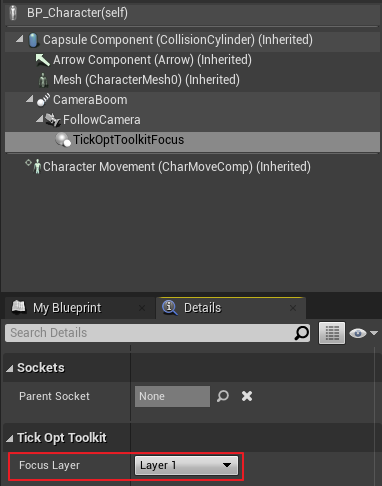
For the plugin to know of the player, you have to attach an optimization focus component to it. In most cases, the best place for this will be the camera component in the player’s pawn.
- Open blueprint of the player’s pawn.
- Select a camera component.
- Press the ‘Add Component’ button.
- In the search box, type ‘tick opt’.
- From the components list, select the ‘Tick Opt Toolkit Focus’ component.
- Save the blueprint.
Setup Basic Actor Optimizations
For most actors, you will need to attach a single optimization target component and configure tick optimization zones. You want to attach the target component to a component, which represents the position of the actor (the root component in most cases):
- Open blueprint of the actor.
- Select the appropriate component (possibly the root component).
- Press the ‘Add Component’ button.
- In the search box, type ‘tick opt’.
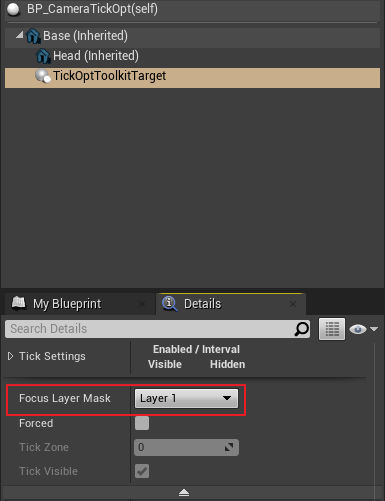
- From the components list, select the ‘Tick Opt Toolkit Target’ component.
- Save the blueprint.
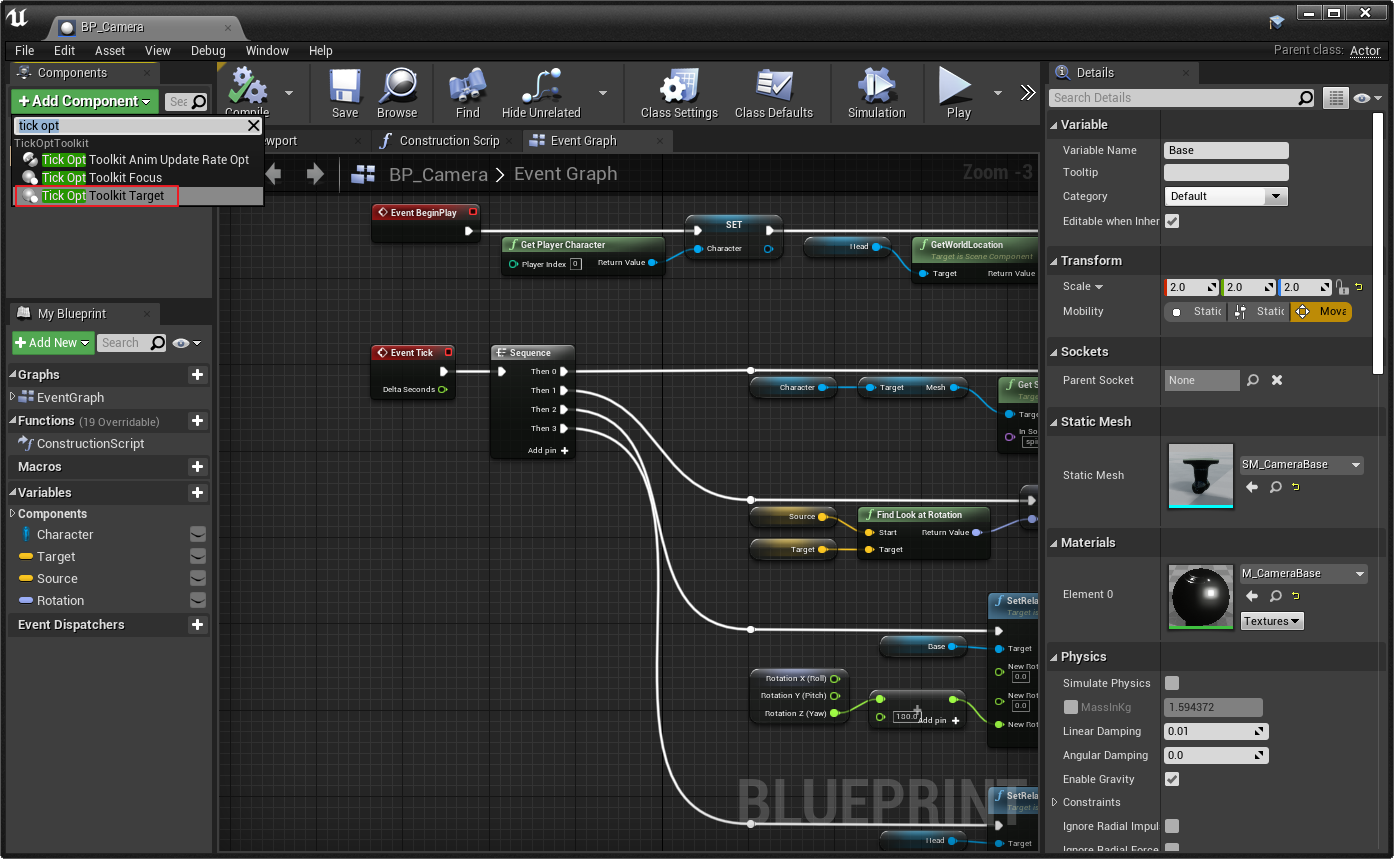
At this point, your actor and all its components and timelines will tick only in a 10m radius from the player.
Customize Actor Optimizations
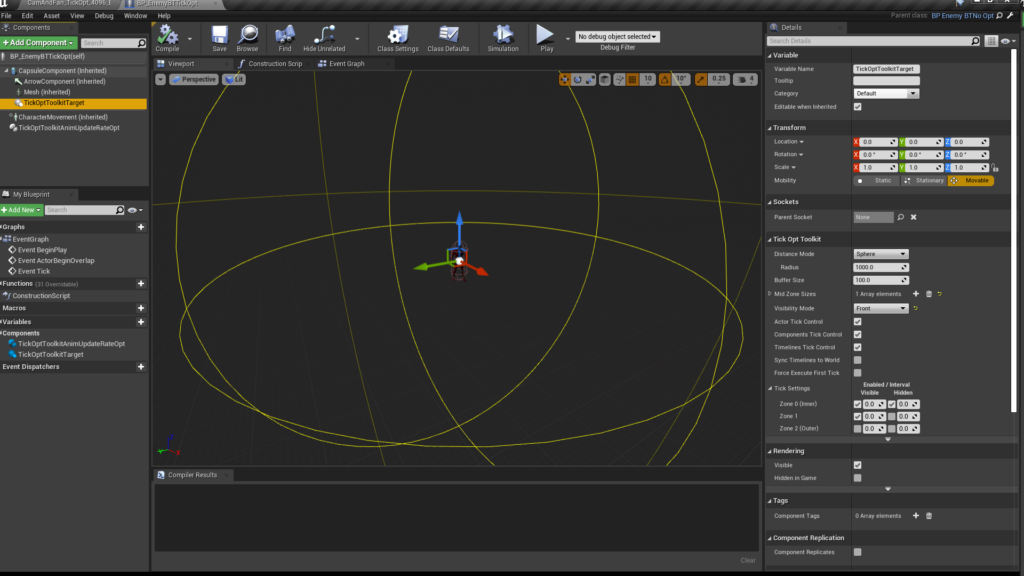
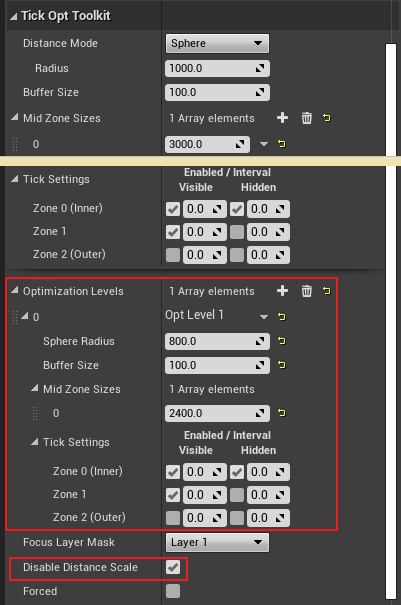
Settings
The basic settings will work fine in some cases, but the target component is highly customizable and allows for much greater control over ticking. Below you can see the configuration used for one of the actors in the example project. In the viewport, you can see the visualization of sphere distance zones used in this example.
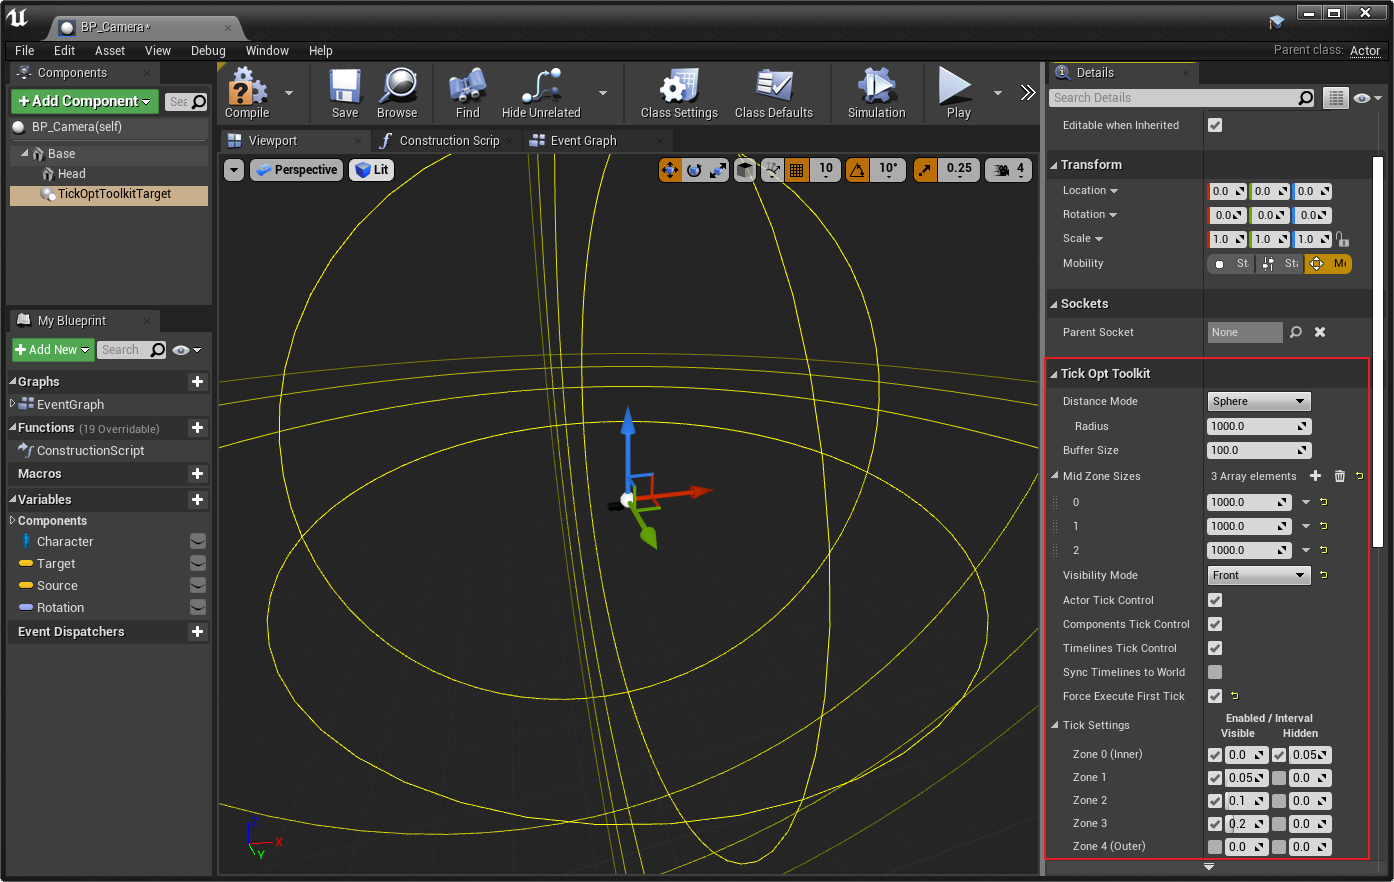
The available settings are:
Distance Mode
This is a mode with which the distance to the focus (player) is determined. It has the following settings:
- Sphere – the basic mode in which the distance is determined by a sphere with a given ‘Radius’.
- Box – the mode in which the distance is determined by Z-axis aligned box with given ‘Extents’ (distances from the center of the box to its walls on each of XYZ axes) and ‘Rotation’ around the Z-axis.
- None – the mode in which the distance is not taken into account.
Buffer Size
The buffer is used to mitigate the issue with an actor being exactly at the distance at which the optimization kicks in and it switches rapidly between states. The distance is extended by the buffer size if the player is inside. If the player exceeds the distance, it has to traverse this additional buffer to get back inside.
Mid Zone Sizes
These are additional optimization zones between inner and outer zones. If we’re using a sphere with a radius of 10m, and three mid zones 10m each, we get 5 zones: 0-10m, 20-30m, 30-40m, and +40m. For each of the zones, we can have different tick settings.
Visibility Mode
This is a mode with which the visibility of the actor is determined. It has the following settings:
- Front – the mode in which everything in front of the focus (player) is deemed visible. This is very fast to calculate and basically can cut the ticks overhead in half.
- Rendered – the mode in which the actor is deemed visible if it has been rendered in the previous frame. This is more accurate but also more costly.
- None – the mode in which the visibility is not taken into account.
Actor Tick Control
If checked, the owning actor’s tick will be automatically controlled with the tick settings (look below).
Components Tick Control
If checked, all the components that were present in the actor before BeginPlay will have their ticks controlled with the tick settings. This includes components added with blueprint editor and construction script but excludes components added in and after the BeginPlay event.
Timelines Tick Control
If checked, all the timelines in the actor will have their ticks controlled with the tick settings.
Sync Timelines to World
If checked, all the timelines will be synced to the world time. In the effect, timelines that are not ticking (are out of range or hidden) will register the passage of time and it will be impossible to perceive that they were paused. The side effect will be, that all the instances of the actor will be synchronized.
This works only for looping timelines.
Force Execute First Tick
If checked, all the ticks controlled by the target component will be fired on the first frame after BeginPlay.
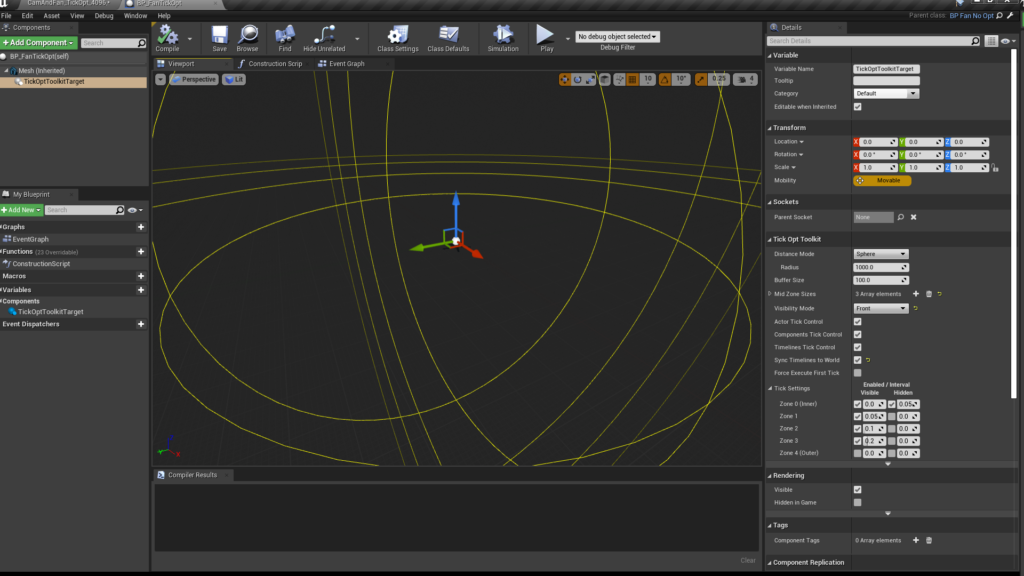
Tick Settings
This is an array of settings used for each combination of distance zone and visibility state of the actor. Each row is a distance zone ordered from the most inner to the most outer. For each zone, there are four setting columns:
- ‘Tick Enabled’ when Visible.
- ‘Tick Interval’ when Visible.
- ‘Tick Enabled’ when Hidden.
- ‘Tick Interval’ when Hidden.
The ‘Tick Interval’ is in seconds, meaning an interval of 0.05 will fire 20 ticks per second, and 0.2 will fire only 5. The value of 0.0 means that the tick will fire every frame.
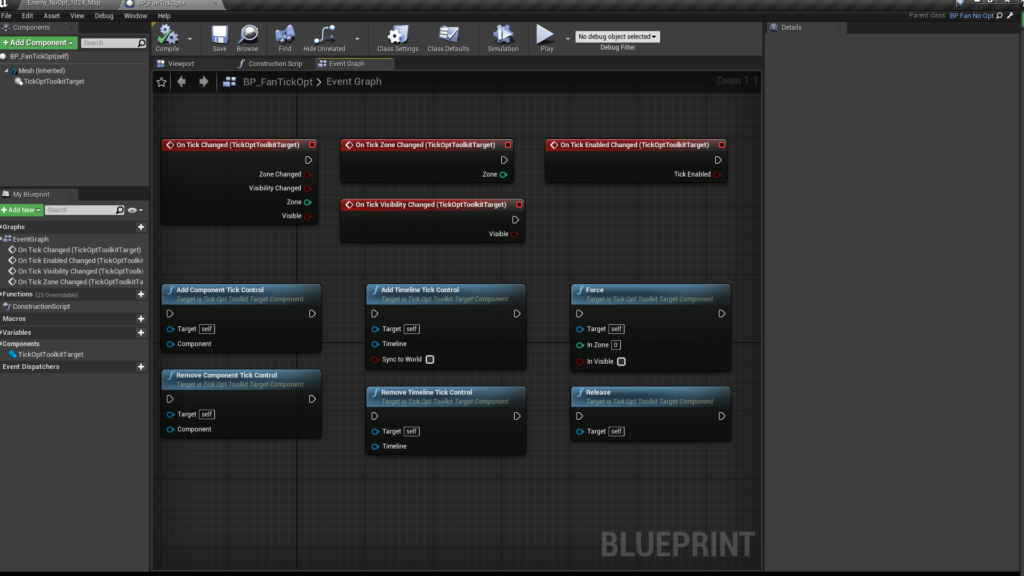
Events
You can further customize actor behavior depending on its distance zone and visibility state using events.
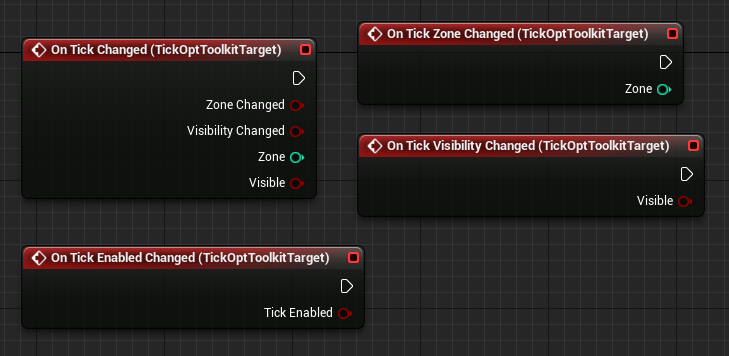
On Tick Changed
Triggered when distance zone and/or visibility state of the actor changes. Its outputs are:
- Zone Changed – true if distance zone did change.
- Visibility Changed – true if visibility state did change.
- Zone – current distance zone.
- Visible – current visibility state.
On Tick Zone Changed
Triggered when distance zone changes. It outputs the current distance zone.
On Tick Visibility Changed
Triggered when visibility state changes. It outputs the current visibility state.
On Tick Enabled Changed
Triggered when the tick of the actor or any of its components or timelines is controlled with tick settings and the tick is enabled/disabled. It outputs the current state of the tick.
Functions
If you need finer control of the components and timelines that should have their tick controlled, you can use the following functions:
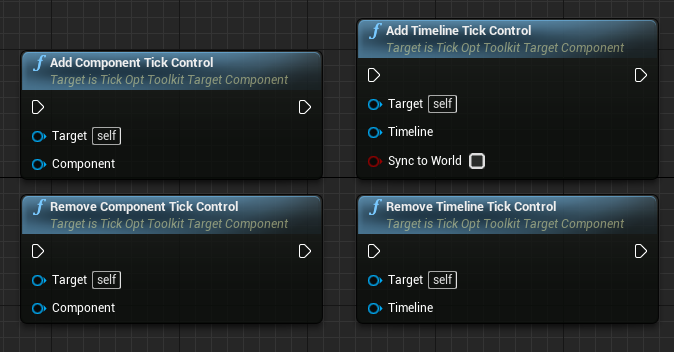
Add Component Tick Control
Can be used to manually add components to tick control, e.g. in the case when the ‘Components Tick Control’ flag is disabled or when the component is constructed in or after the BeginPlay event.
Should be called in or after BeginPlay event.
Remove Component Tick Control
Can be used to remove components from tick control, e.g. in the case when the ‘Components Tick Control’ flag is enabled but the component’s tick should not be controlled or when the component is about to be destroyed.
Should be called in or after BeginPlay event.
Add Timeline Tick Control
Can be used to manually add timelines to tick control, e.g. in the case when the ‘Timelines Tick Control’ flag is disabled. Additionally to the timeline, it takes as an input ‘Sync to World’ flag that works the same as ‘Sync Timelines to World’ property, but only in the context of the one added timeline.
Should be called in or after BeginPlay event.
Remove Timeline Tick Control
Can be used to remove timelines from tick control, e.g. in the case when the ‘Timelines Tick Control’ flag is enabled but the timeline’s tick should not be controlled.
Should be called in or after BeginPlay event.
Scalability
There are two ways to scale tick optimizations for different platforms or device configurations.
Tick Distance Scale
You can scale all tick distance settings globally using ‘tot.TickDistanceScale’ console variable. This variable influences sphere radius, box extents, mid zone sizes, and buffer size. Reducing the scale will reduce tick CPU cost for all actors with target components.
An actor can be excluded from the global tick distance scaling with the use of the ‘Disable Distance Scale’ property. You’ll find it in the advanced properties section.
Tick Optimization Level
For finer control, you can add optimization levels to your target components. An optimization level is a set of property overrides that are used based on the value of ‘tot.TickOptimizationLevel’ console variable. If this variable is set to a value greater than 0, appropriate optimization level overrides are used.
An optimization level can override sphere radius, box extents, mid zone sizes, buffer size, and tick settings. You cannot override the number of mid zone sizes, only the values. Distance properties overrides are influenced by ‘tot.TickDistanceScale’ variable, so remember to use the ‘Disable Distance Scale’ property, if you’re changing them using optimization levels.
Optimization levels can be found in the advanced properties section.
Using the console variables
Console variables can be used in multiple places:
- [ConsoleVariables] section of Engine.ini files (e.g. IOSEngine.ini, AndroidEngine.ini).
- [DeviceProfile] sections of DeviceProfile.ini files (using ‘+CVars=’ declaration).
- From Blueprint, using the ‘Execute Console Command’ node.
- From C++, using Console Manager (e.g.
IConsoleManager::Get().FindConsoleVariable(TEXT("tot.TickDistanceScale"))->Set(0.8f)). - From the console accessible with the ~ key.
Force
There’s an additional feature that allows you to force a set state of zone distance and visibility mode. This can be useful to force a particular actor instance to tick every frame or be disabled regardless of its distance from the player.

For this, you can use a set of advanced properties (to make the actor forced by default) or functions.
Properties
In the advanced section of properties, you have a flag ‘Forced’ that, if enabled, will make the actor force by default. The ‘Tick Zone’ and ‘Tick Visible’ properties will in this case be used as the set state unimpacted by the true distance and visibility.
The ‘Tick Zone’ property will be clamped to the appropriate zones range.
Functions
You can use the ‘Force’ function to set the forced state of your choosing, and the ‘Release’ function to release the forced state and return the target component to the normal operation.
The ‘In Zone’ input will be clamped to the appropriate zones range.
Focus Layers
You can place focuses on different layers and make targets take only some layers into account. For example, you can have separate focuses for enemies and for the environment.
You have 16 layers to your disposition. All focuses and targets use the first layer by default.
Settings
First, you have to enable focus layers support in the plugin settings. Focus layers have little impact on performance, but we don’t want to pay the cost if we don’t use them.
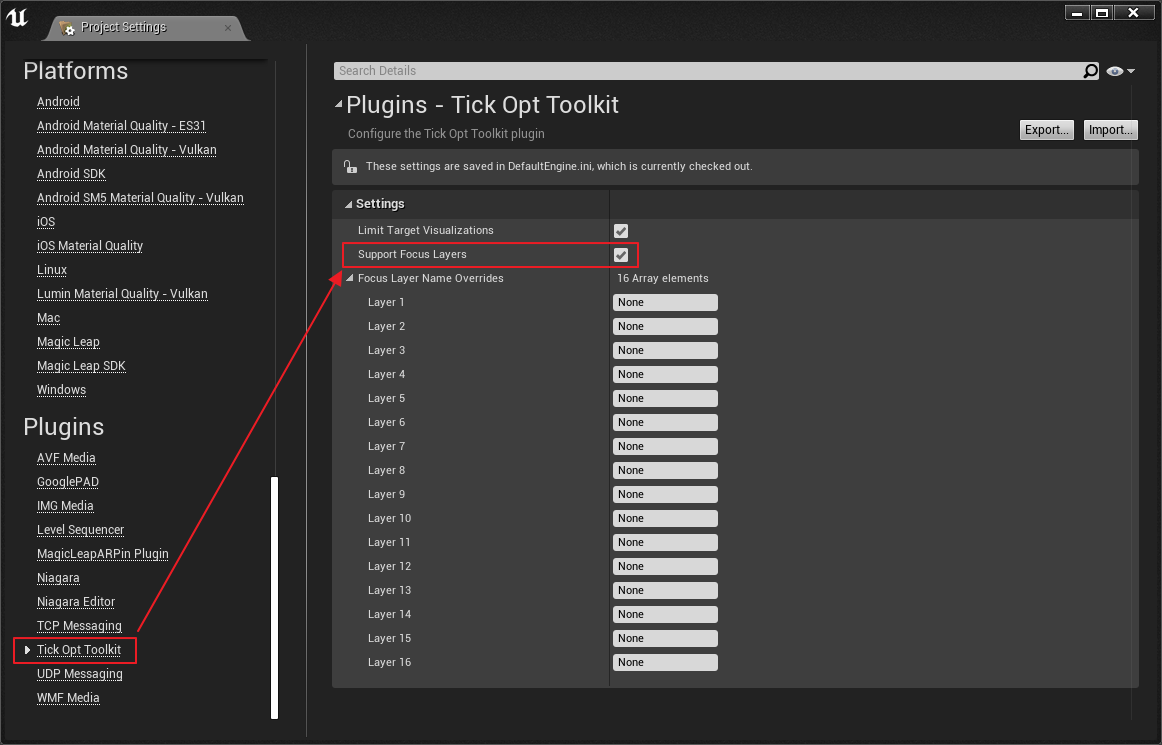
You can also override layer names in the settings, for convenience.
Focus Setup
You’ll find the ‘Focus Layer’ property in the ‘Tick Opt Toolkit’ section of the focus component details.
Target Setup
You’ll find the ‘Focus Layer Mask’ property in the advanced part of the ‘Tick Opt Toolkit’ section of the target component details. You can select multiple layers for the target to consider.
Multiplayer Support
The system does not interfere with the replication, nor needs to be replicated itself. One thing that is taken into consideration is the possibility of multiple optimization focuses (players). This case is handled differently depending on the net mode:
- Listen/Dedicated Server – all the focuses are taken into account.
- Client/Standalone – only focuses with a local net owner are taken into account.
When there are multiple focuses taken into account, the system works as follows:
- Distance Zone – calculated based on the closest focus.
- Visibility State – visible if any focus can see the actor.
‘Rendered’ Visibility Mode
‘Rendered’ visibility mode should be used only in standalone games and local multiplayer. The server does not know when an actor is rendered on the client.
Custom Support for Multiple Focuses
If you would like to change the way multiple focuses are handled in a multiplayer game (or maybe some other situation), you can create a child component of the ‘Focus Component’ and override the ‘Should Track’ function. The function is evaluated for each frame for each focus, and if it returns ‘true’, the focus is taken into account in the calculations.
Animation Update Rate Optimizations
Animation Update Rate Optimizations is an Unreal Engine 4 feature, mentioned in Animation Optimization section of the UE4 documentation. This feature works similarly to the way the rest of this plugin works, but only for animated skinned/skeletal mesh components. It not only reduces the rate at which skinned/skeletal mesh animations are updated (ticked) but also allows for interpolation between frames and properly handles things like root motion. On the other hand, it uses the actor’s screen size instead of its distance from the player to determine the update rate, which can be less intuitive.
The Animation Update Rate Optimizations can be used in conjunction with the focus/target components pair. It can produce a better-looking result for skinned/skeletal mesh animations, than using only the target component.
However, depending on the needs, the target component can be used on its own, even on skinned/skeletal mesh components.
Setup Update Rate Optimizations
The Update Rate Optimizations are controlled using a separate component. To add the component:
- Open blueprint of the actor with a skinned/skeletal mesh component.
- Press the ‘Add Component’ button.
- In the search box, type ‘tick opt’.
- From the components list, select the ‘Tick Opt Toolkit Anim Update Rate Opt’ component.
- Save the blueprint.

Settings
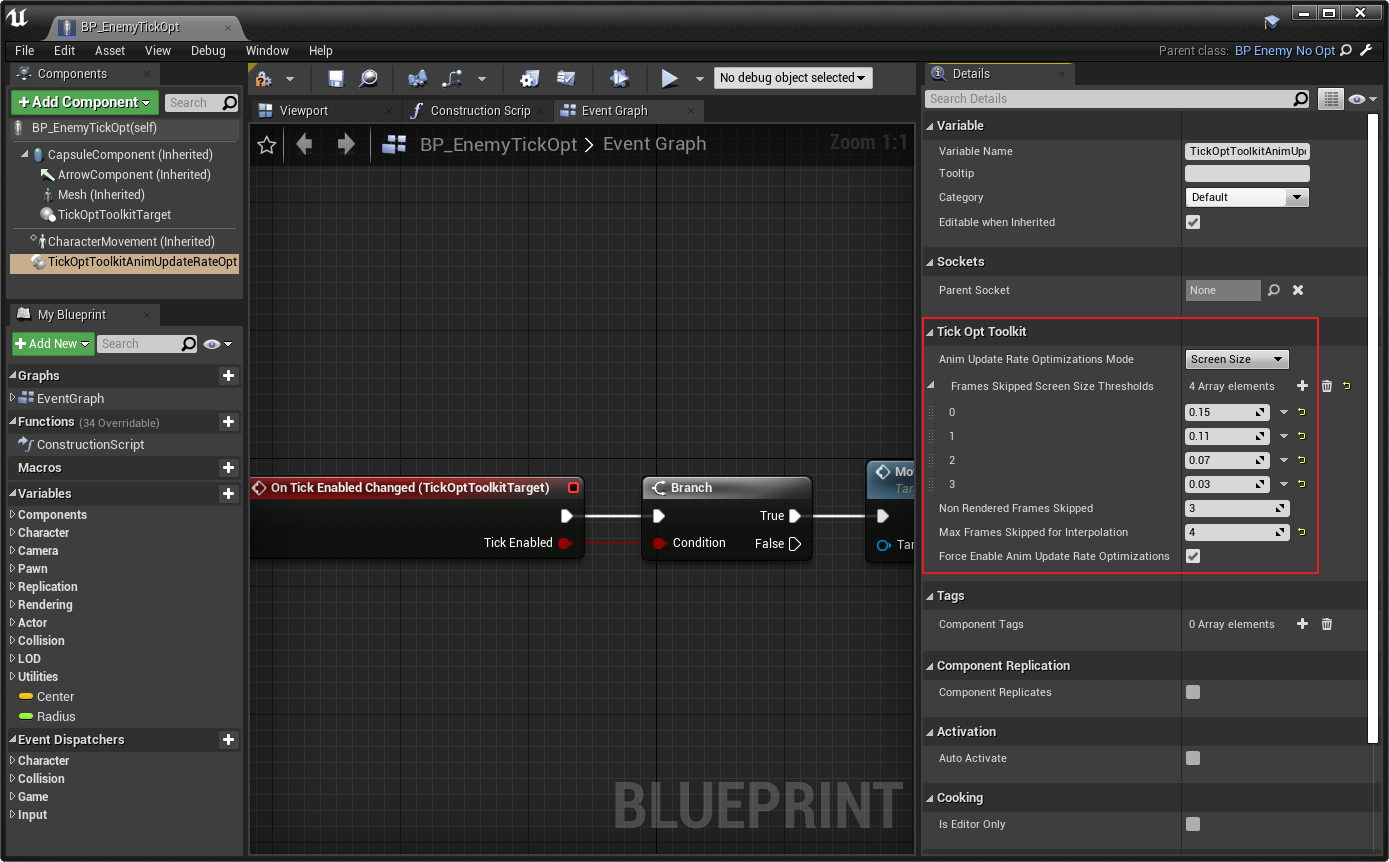
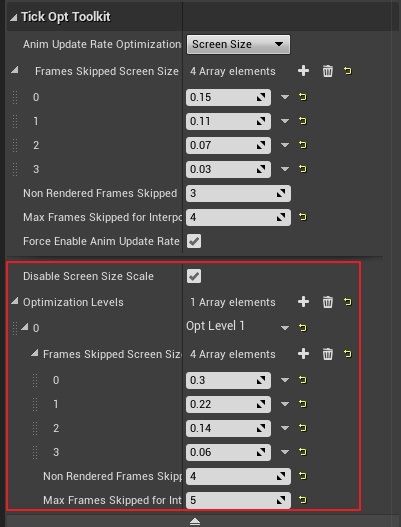
Anim Update Rate Optimizations Mode
The mode in which the number of skipped frames is determined. It has the following settings:
- Screen Size – uses relative screen size (1.0 means full screen) based on the bounding sphere and smaller screen dimension.
- LOD – uses currently used LOD of the skinned/skeletal mesh component.
- MinLOD – uses minimal LOD of the skinned/skeletal mesh component.
Frames Skipped Screen Size Thresholds
The mapping used to calculate the number of skipped frames in ‘Screen Size’ mode. The index in the array is the number of skipped frames and the value is the lower limit of the screen size that allows for this number of skipped frames.
LOD to Frames Skipped
The mapping used to calculate the number of skipped frames in ‘LOD’ and ‘MinLOD’ modes. The index is the LOD and the value is the number of skipped frames to use for the LOD.
Non Rendered Frames Skipped
The number of skipped frames when the skinned/skeletal mesh has not been rendered in the previous frame.
Max Frames Skipped for Interpolation
The maximum number of skipped frames allowing for frame interpolation. If the number of skipped frames is greater, the previously calculated frame will be used.
Force Enable Anim Update Rate Optimizations
If checked, will enable Update Rate Optimizations in every skinned/skeletal mesh component in the actor. Normally, this optimization has to be enabled manually for each component. This property allows for doing this in one place.
Functions
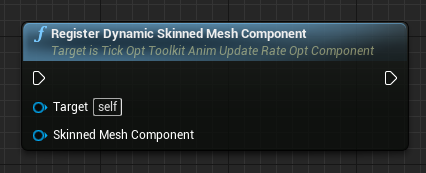
Register Dynamic Skinned Mesh Component
Register skinned/skeletal mesh component that has been created in or after the BeginPlay event. This function obeys the ‘Force Enable Anim Update Rate Optimizations’ flag, and if the flag is checked it will enable optimizations on the registered component.
This function MUST be called for every skinned/skeletal component created dynamically, even if the component won’t have the Update Rate Optimizations enabled.
Scalability
Similar to the target component, there are two ways to scale tick optimizations for different platforms or device configurations.
URO Screen Size Scale
You can scale all ‘Frames Skipped Screen Size Thresholds’ globally using ‘tot.UROScreenSizeScale’ console variable. Increasing the scale will reduce animation CPU cost for all actors using Anim Update Rate Optimization with ‘Screen Size’ mode.
An actor can be excluded from the global screen size scaling with the use of the ‘Disable Screen Size Scale’ property. You’ll find it in the advanced properties section.
URO Optimization Level
For finer control, you can add optimization levels to your anim update rate optimization component. An optimization level is a set of property overrides that are used based on the value of ‘tot.UROOptimizationLevel’ console variable. If this variable is set to a value greater than 0, appropriate optimization level overrides are used.
An optimization level can override ‘Frames Skipped Screen Size Thresholds’, ‘LOD to Frames Skipped’, ‘Non Rendered Frames Skipped’, and ‘Max Frames Skipped for Interpolation’. ‘Frames Skipped Screen Size Thresholds’ property overrides are influenced by ‘tot.UROScreenSizeScale’ variable, so remember to use the ‘Disable Screen Size Scale’ property if you’re changing it using optimization levels.
Optimization levels can be found in the advanced properties section.
Presets
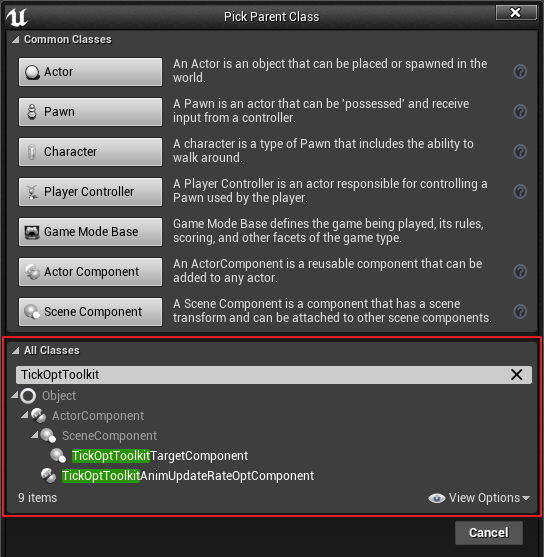
To create a preset for either Target or Anim Update Rate Optimization components, you can create a Blueprint with an appropriate component as the parent class.
- In the Content Browser right-click to open a context menu.
- From the ‘Create Basic Asset’ section select ‘Create Blueprint Class’.
- In the search field type ‘TickOptToolkit’.
- Select the component class you want to create a preset of.
- Open a newly created blueprint and configure it to your liking.
- Use the blueprint instead of the base component class, when adding the component to your actor.